A Lesson to Learn From...

I recently gave an old friend a lesson. Having not taught him for a few years I had an inkling as to what to expect, but things came together so well I thought the information might be beneficial to more than just one student.

This is why looking at still frames of an athletic motion can be deceiving. There are six different images/videos here that we will go through in a specific order. To get the most out of this post please make sure you go through this it slowly. Be sure you comprehend each image before moving to the next…

614EC106-E63C-4C19-B0D3-B858E784B158.JPG

(The original/before is always on the right in all of the images/videos)

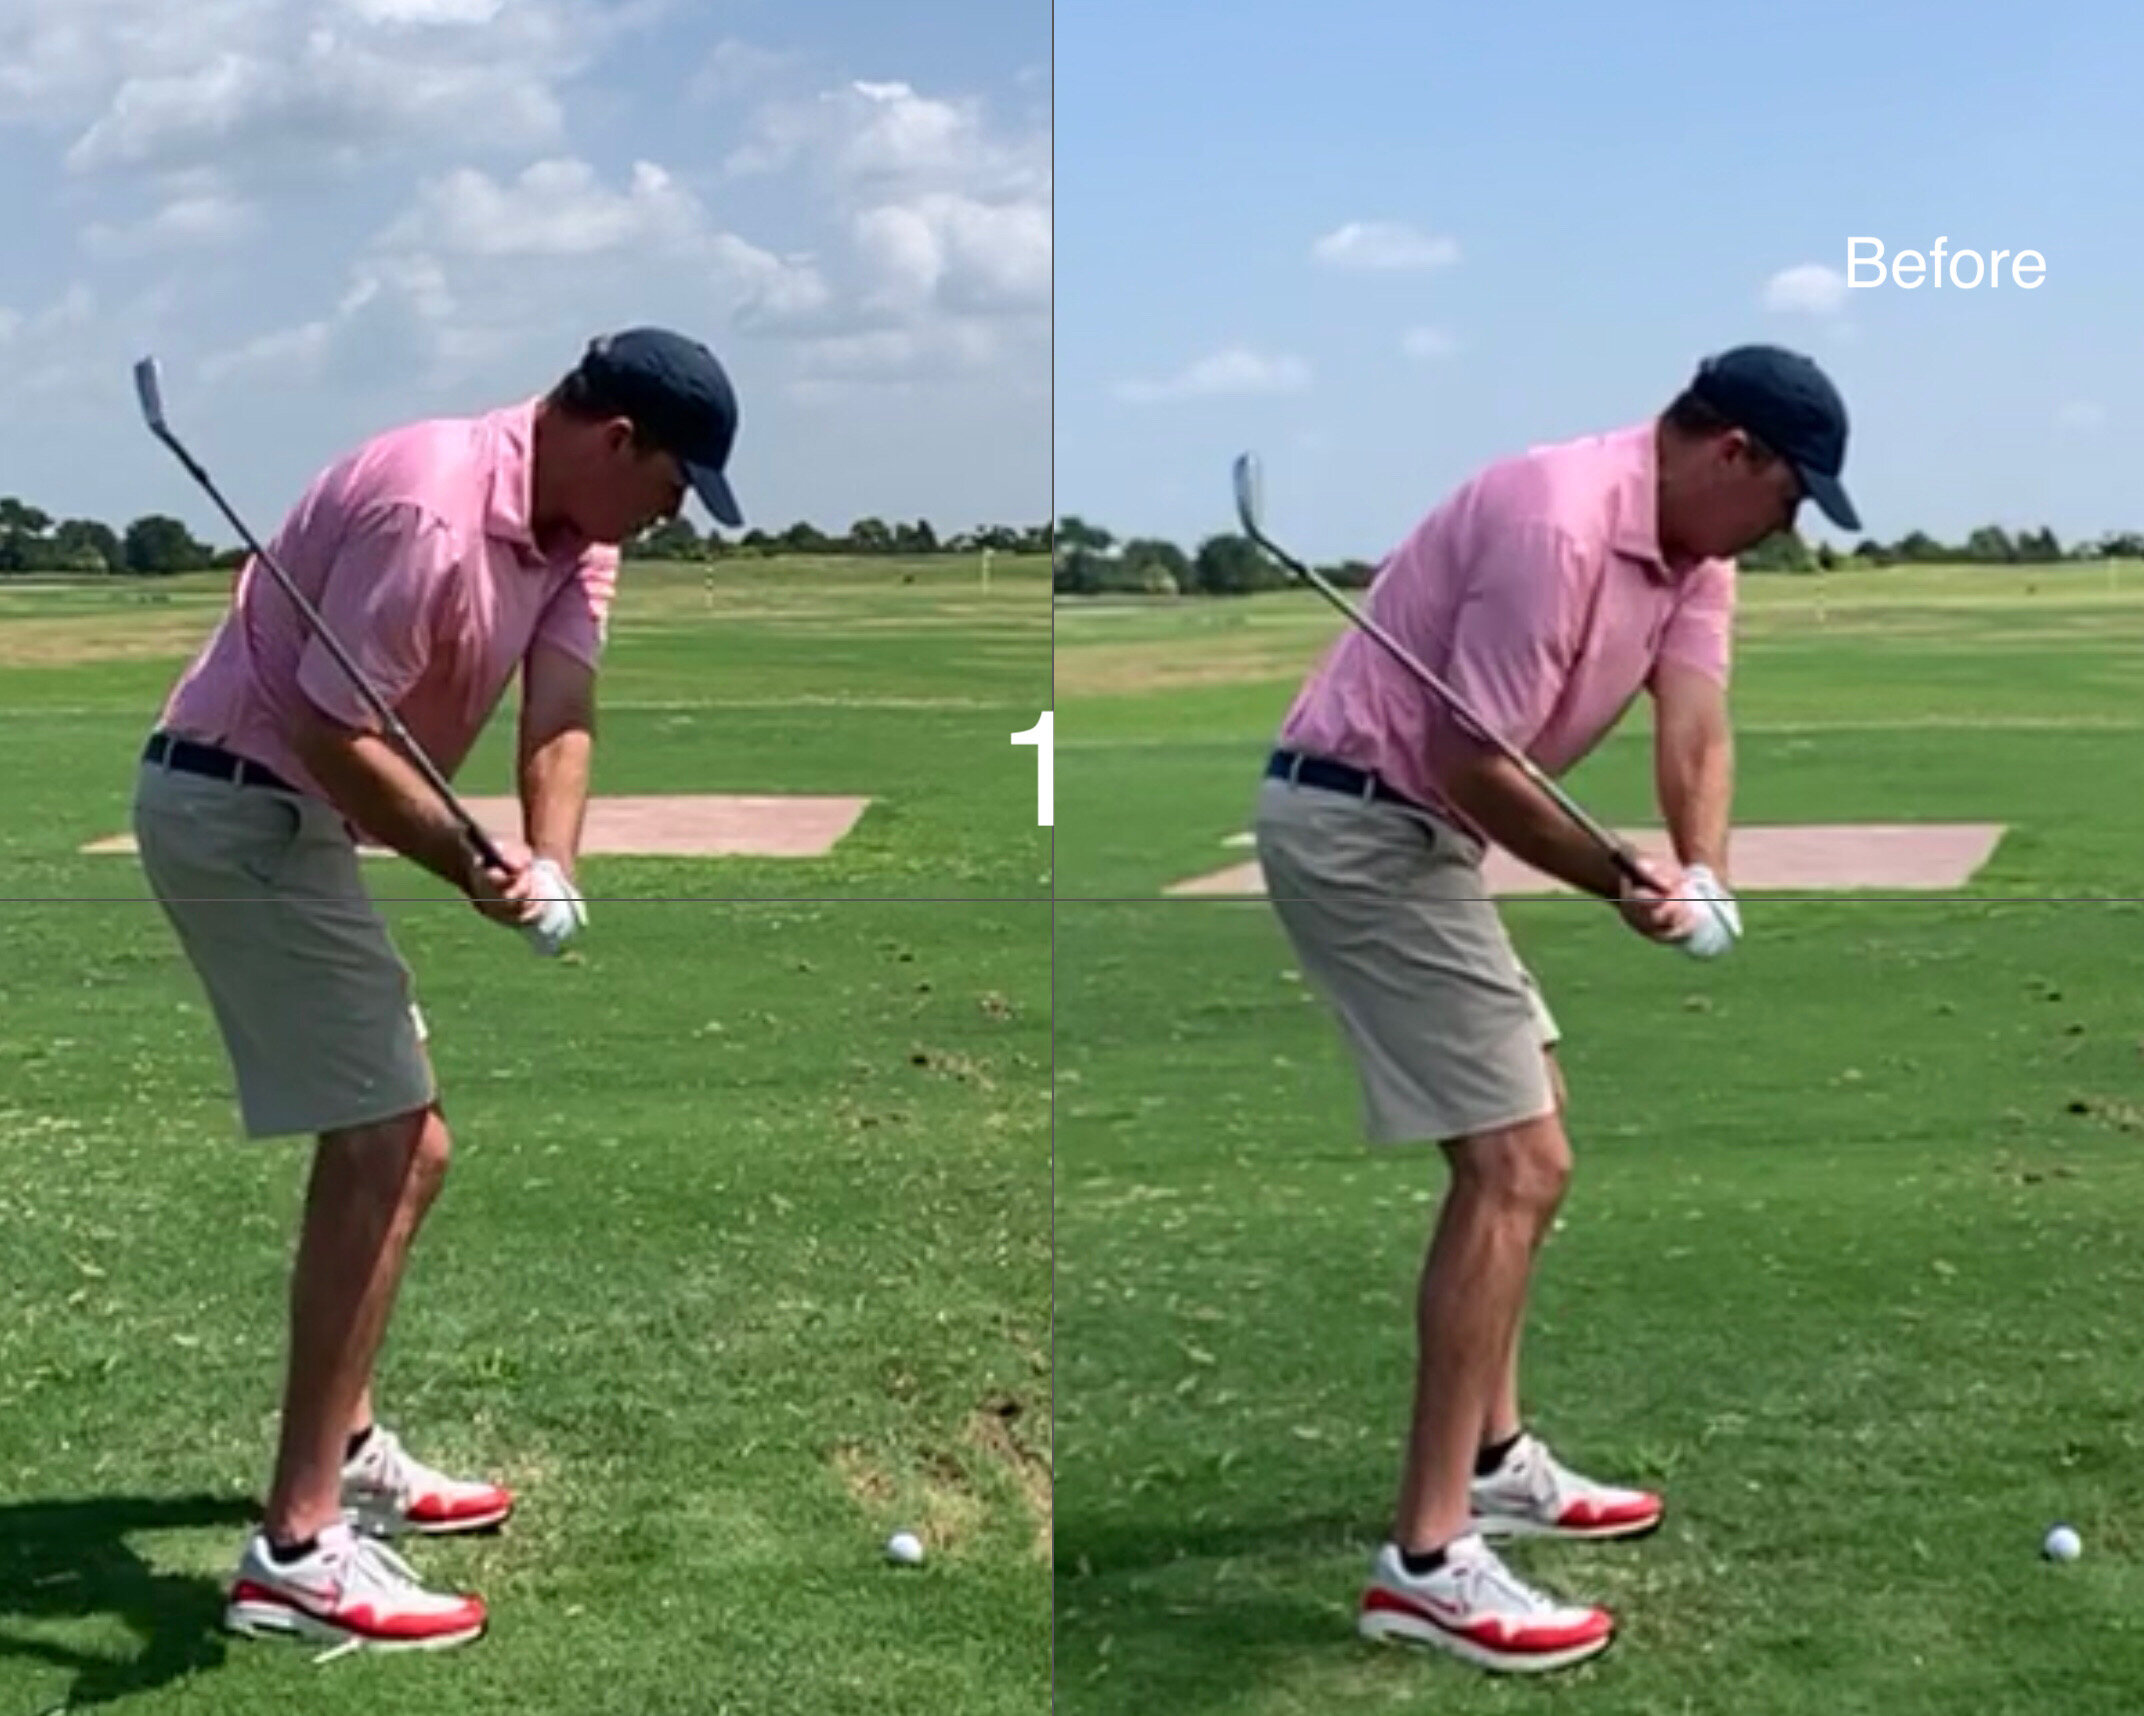
Image 1:

Notice how these two images appear to be somewhat similar. I think many of us would give them both a thumbs up! They might be somewhat similar, but the outcomes are very different due to the unseen forces being applied to the club. Do not be deceived!

DB255940-B2A6-477C-B9A5-F8545133331B.JPG

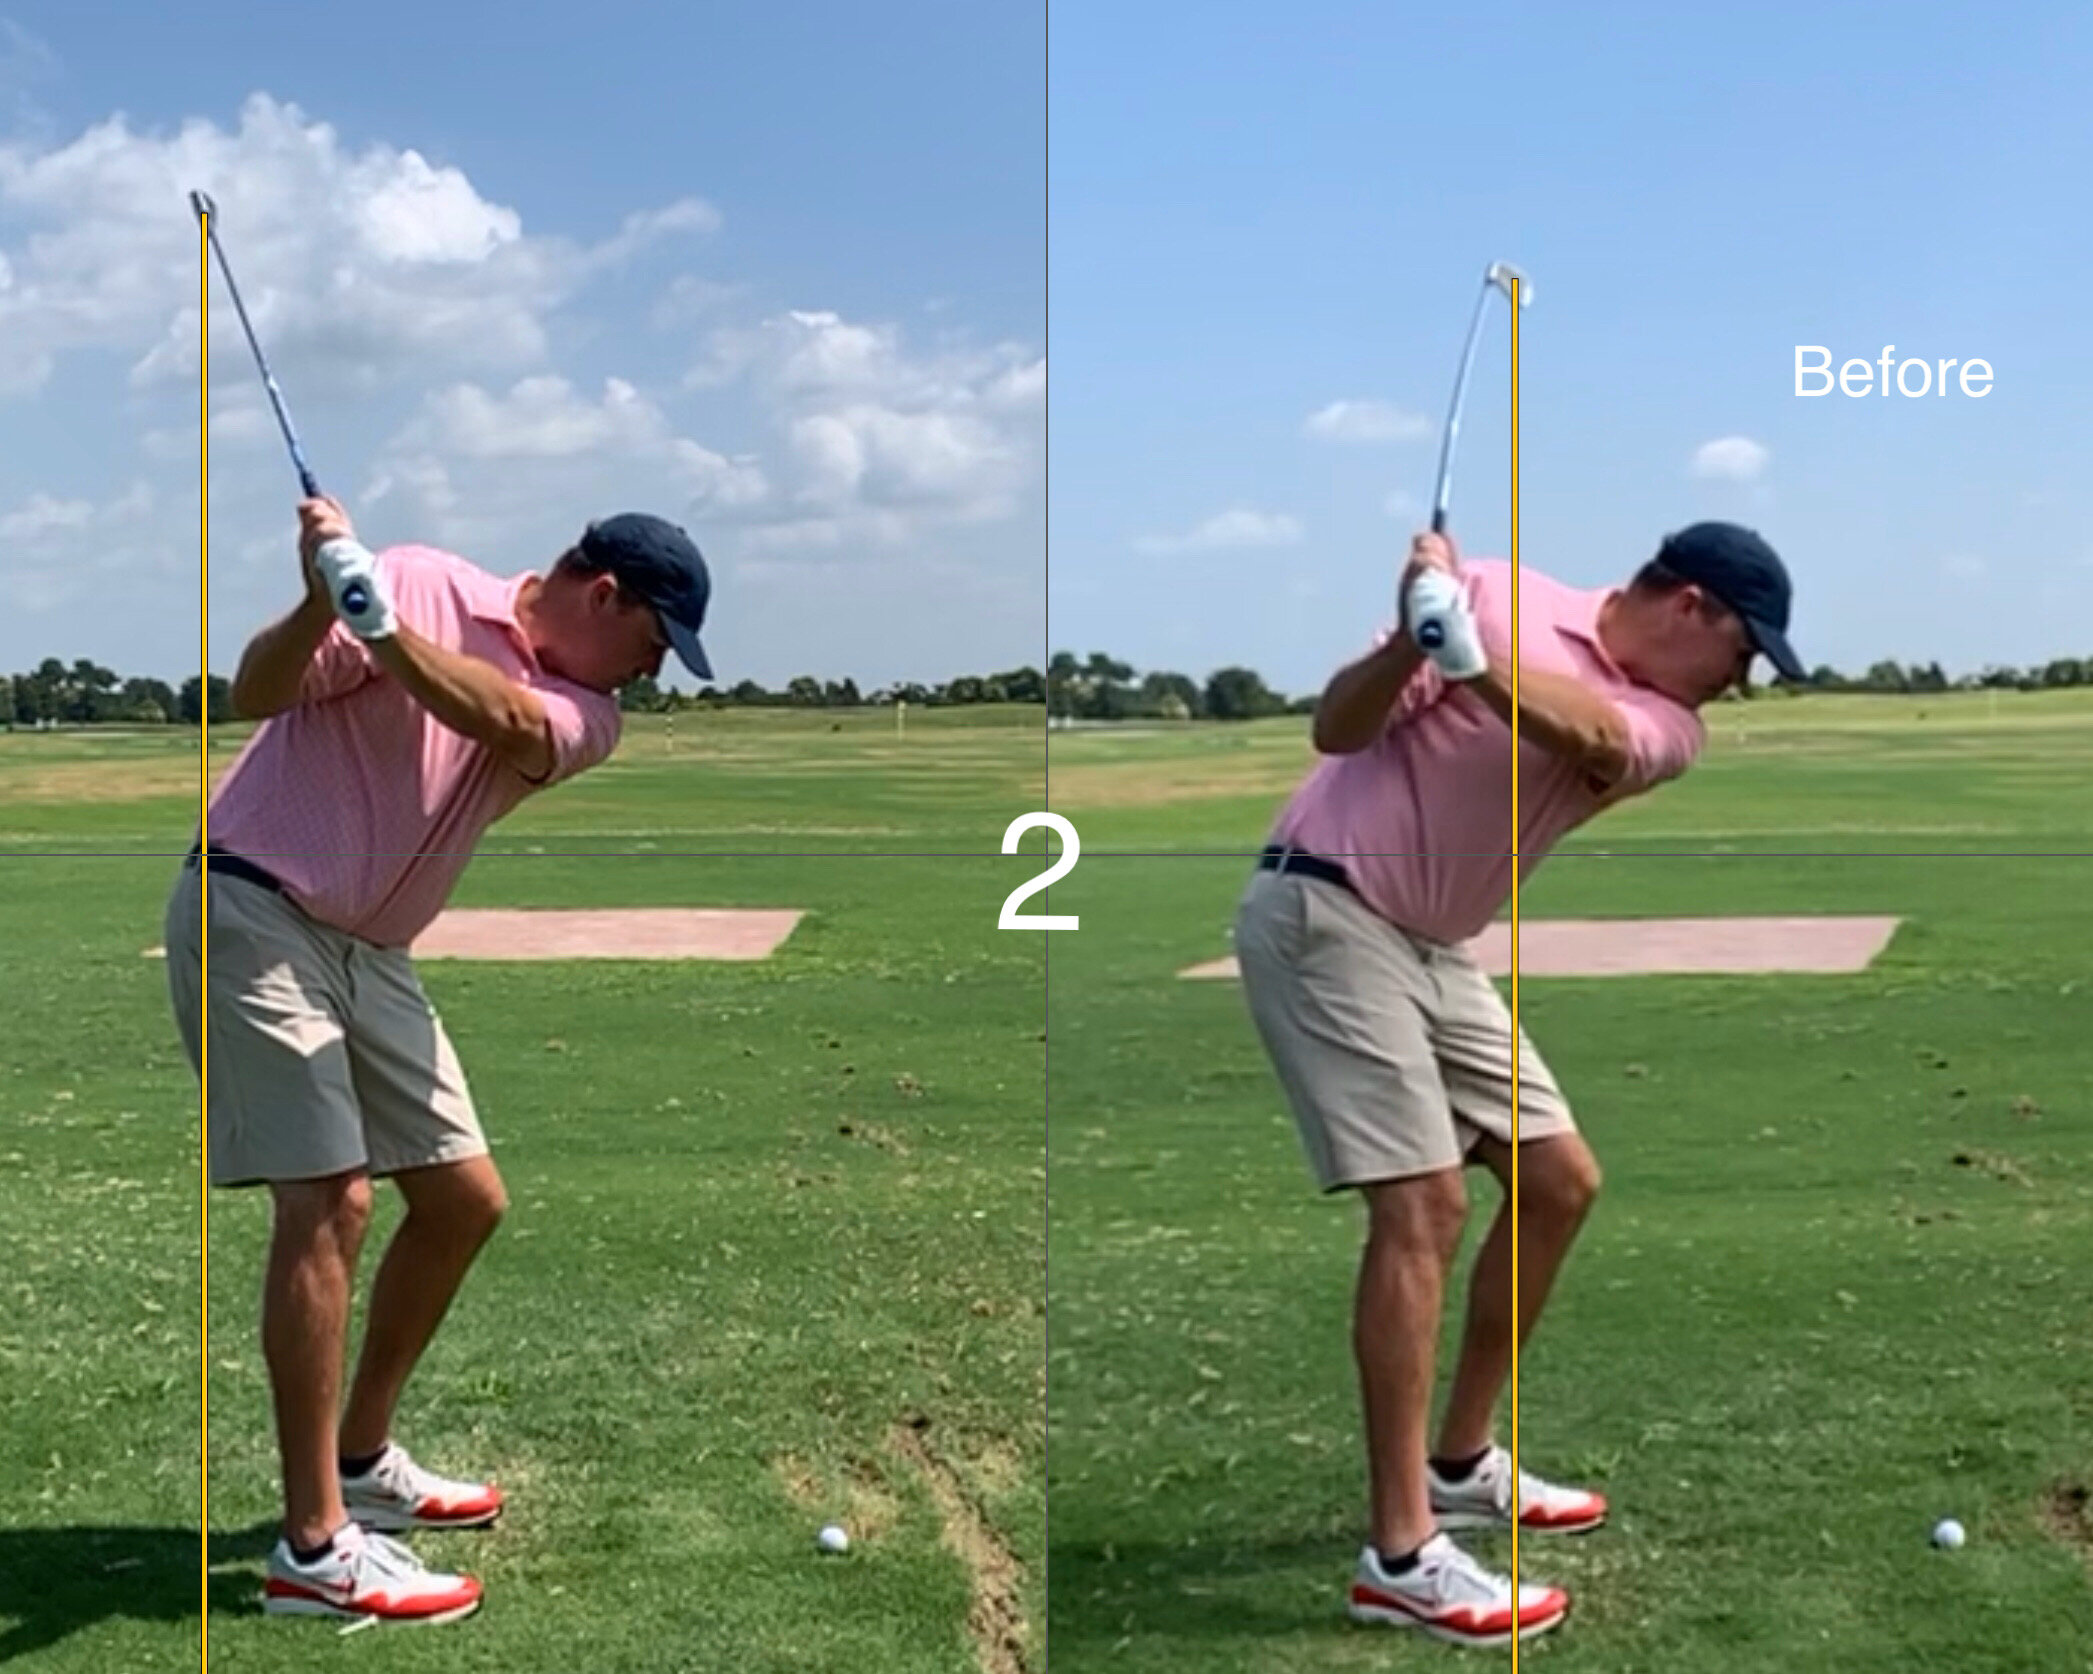
Image 2:

The player at the top of the backswing. The yellow line indicates where the sweet spot is relative to the feet and the golf ball. Notice that in the ‘after’ version the club head is significantly further to the inside than the original. This is shown by the distance between the line and the golf ball.

6F07DEF0-8421-449C-A111-4320A3C4E2B8.JPG

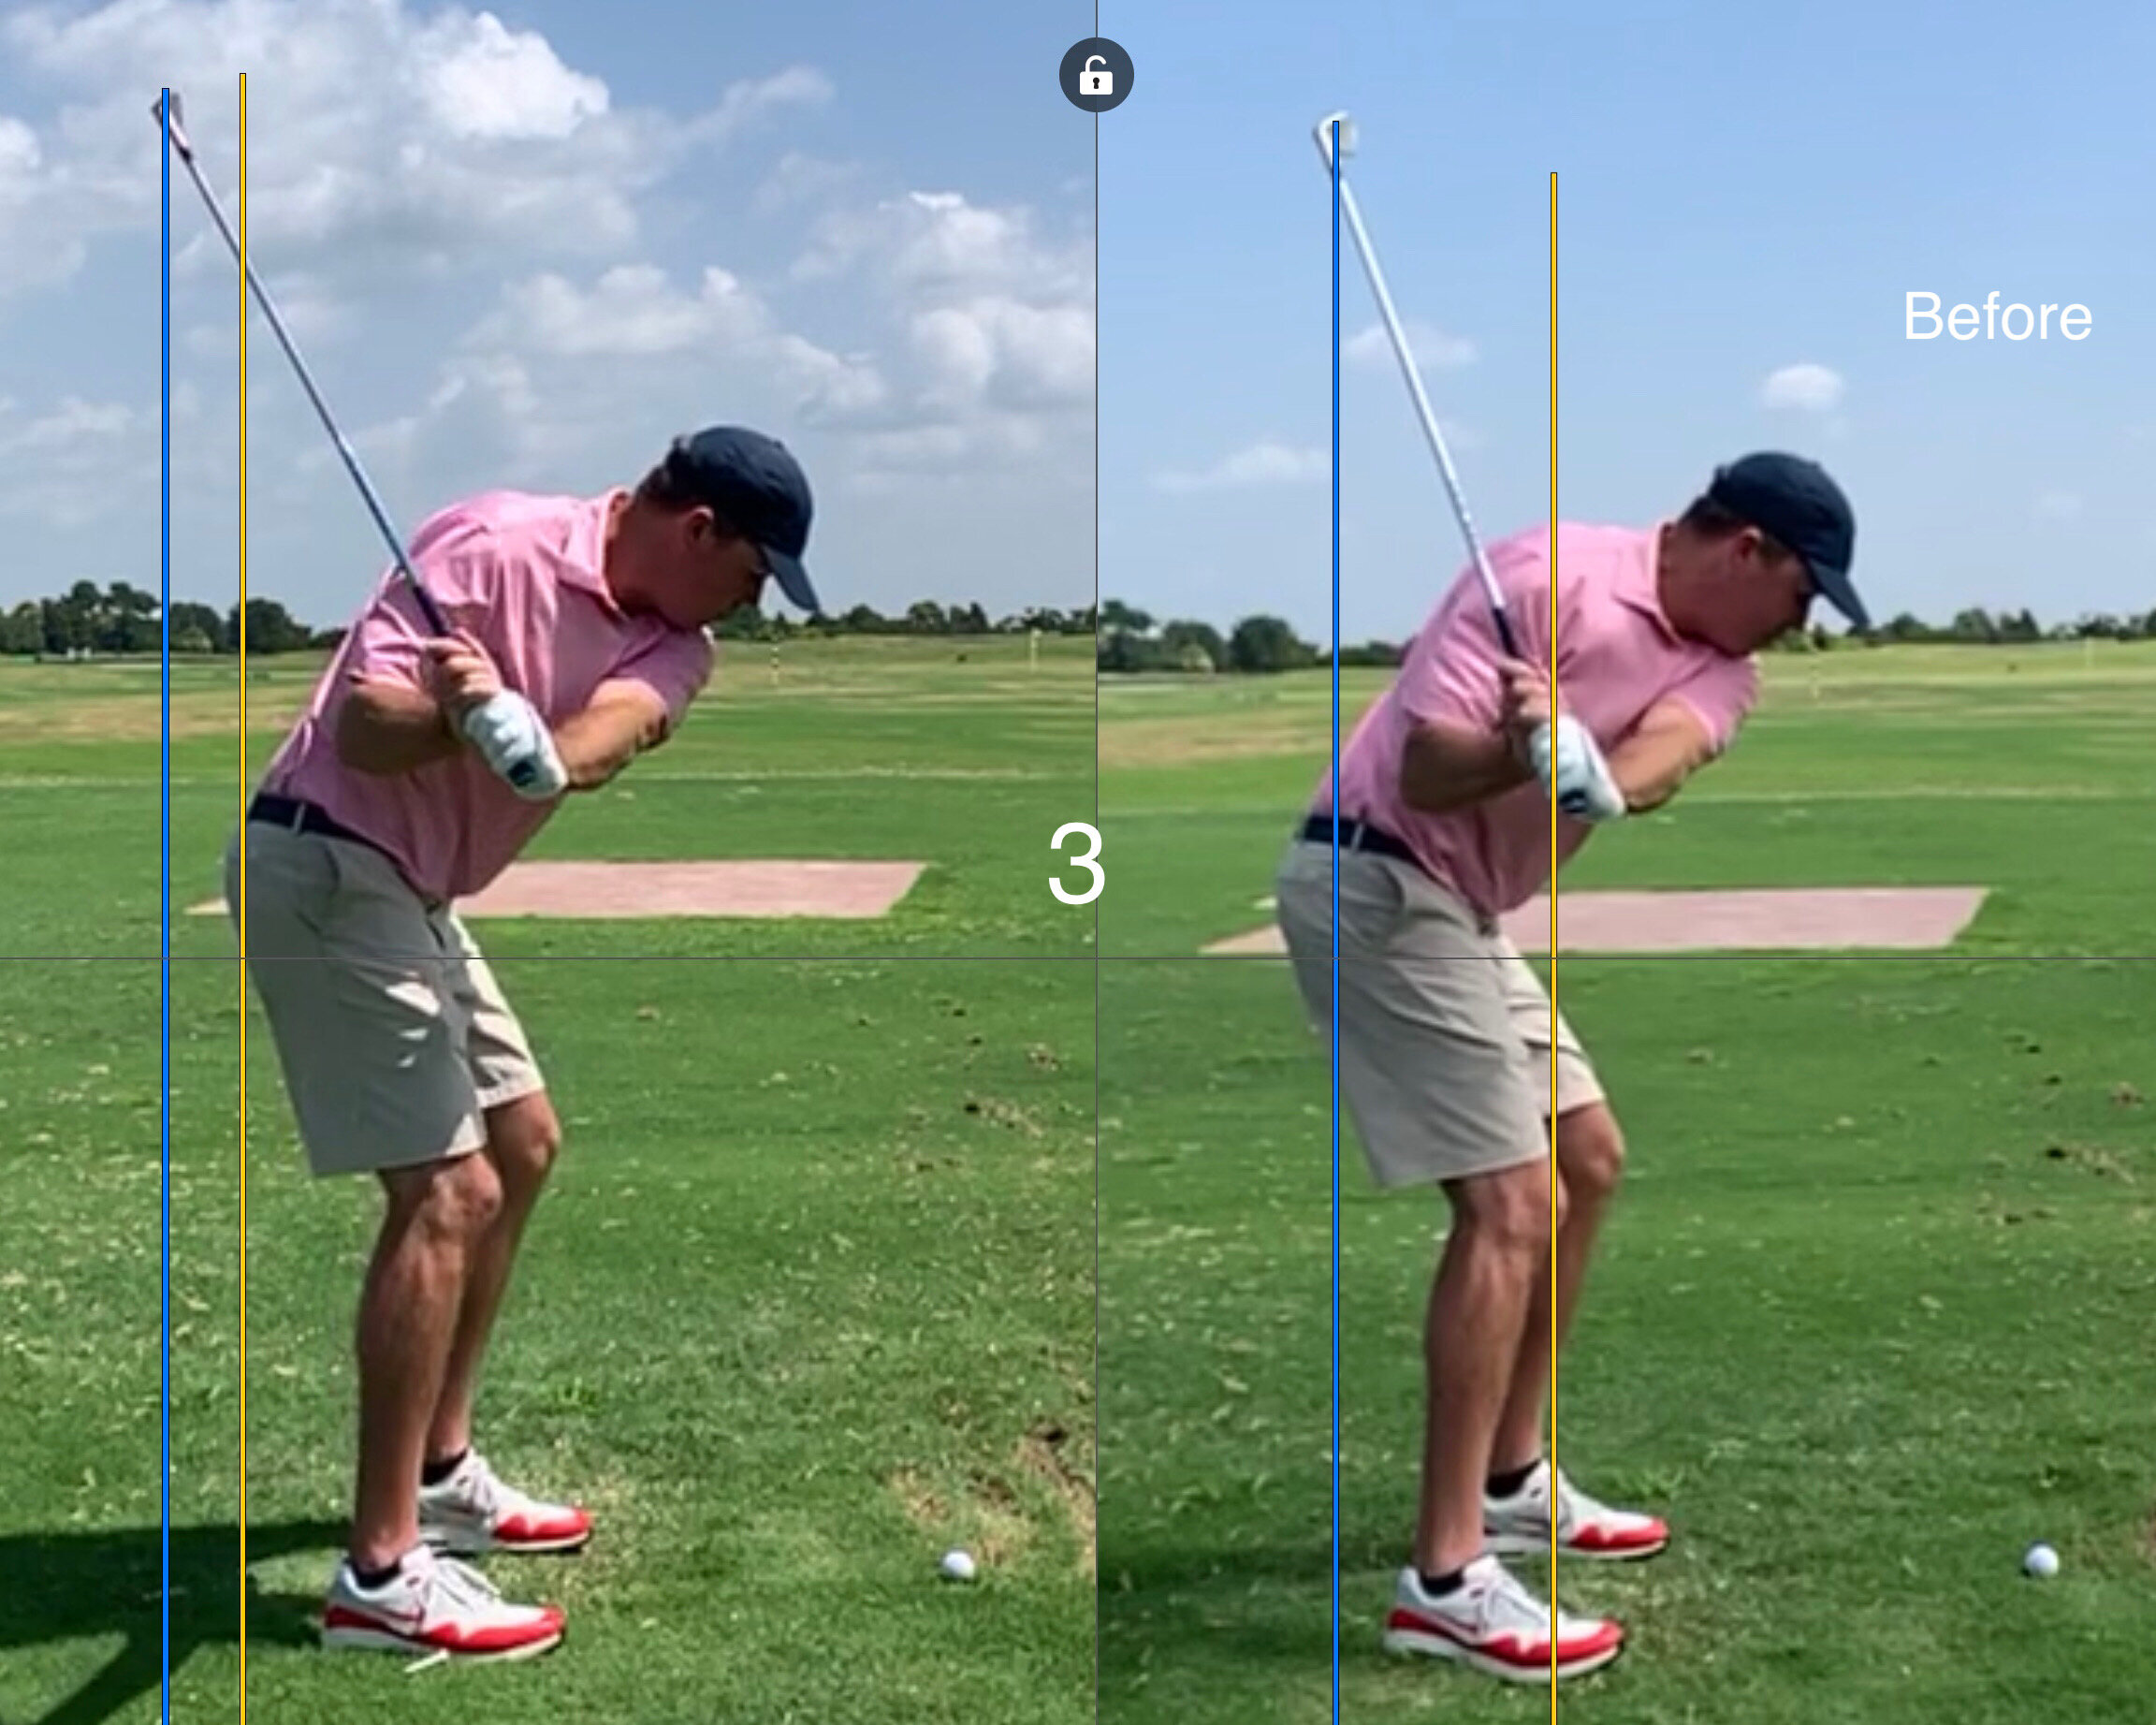
Image 3:

At approximately lead arm parallel to the ground notice how the golfer has had to force the club head to lay down on the before side. This is indicated by the difference in gap between the yellow and blue lines. Not much difference here, but the force the player is exerting on the club is very different here.

F07F5352-2ECE-48A5-BDD0-EE6285807F13.JPG

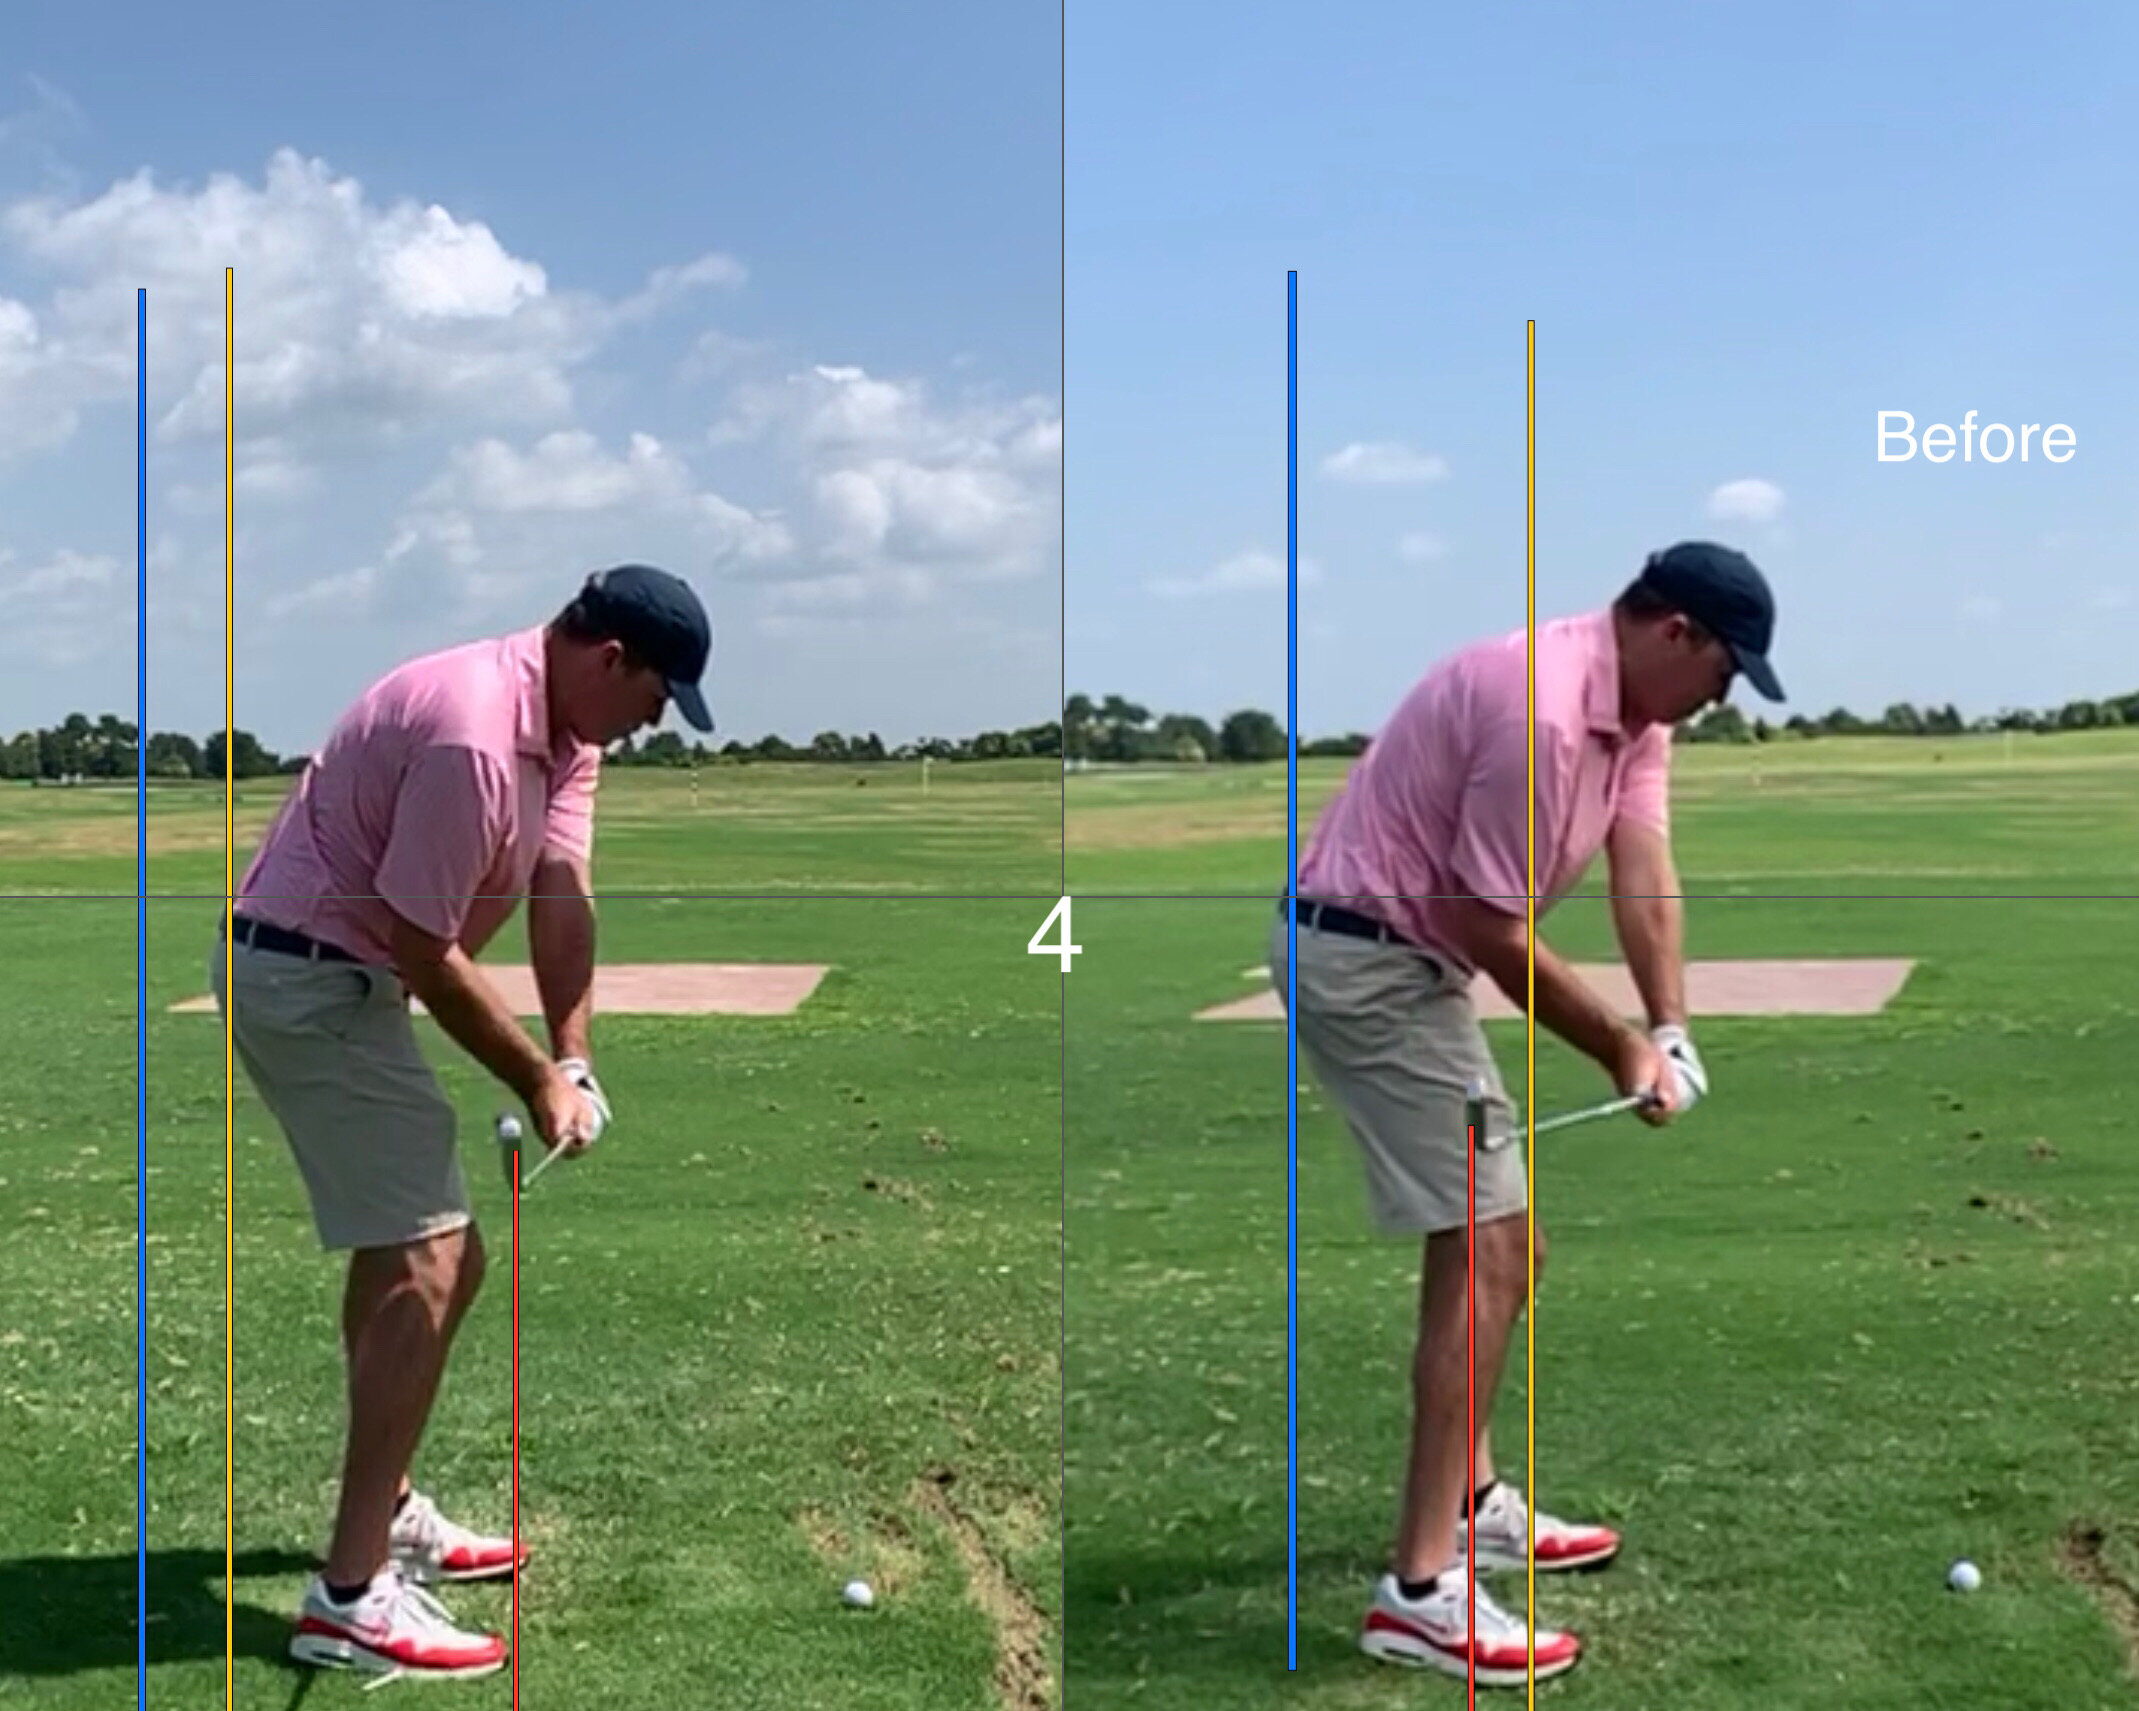
Image 4:

This is where the difference starts to show. On the right side you’ll notice that the excessive, yet necessary, lay down force has bled over and now has the club head in a position where the path will be too far out to the right, strike quality will be compromised and the player is dealing with blocks and hooks. Notice how the gap between blue and red line on the left is greater on the left side. That’s due to the fact that the golfer is free to rotate instead of having to force the club head to the inside in the downswing. Who wouldn’t want to turn hard and fire in the downswing?

Image 5:

The original downswing! With this move the golfer gets the club head too far to the inside coming into the golf ball and will struggle with blocks, hooks and poor quality strikes. Success with this downswing is very much timing reliant.

Image 6:

The objective for the downswing! With this move the golfer will deliver the club with a more neutral path, will hit down on the ball appropriately and be far less reliant on timing coming into impact. A happy golfer and coach.

So how did we get it done? With a short-ish backswing the club head needed to be in a better position at the top of the backswing as the player had very little time to calibrate and position the club head for a proper delivery. Our goal was to improve the position at the top of the backswing in order to make the downswing free-er so the golfer could rotate hard left through impact. A good recipe for crisp strikes coupled with improved accuracy.

The results here were as intended - a more neutral path and better attack angle for straighter and properly struck shots.

Please don’t ever judge a golf swing by one picture.

My 3 Keys to Great Wedge Play

If you dread any form of pitch or chip shot then this article is expressly for you. If you feel like you could save a few more strokes around the greens then this article is for you. Utilizing better technique will literally make these shots easier. Here are a few straightforward improvements that will get the job done. Watch...

Key #1: Set Up

  • Feet should be close together. The most common mistake I see is a stance that's too wide.
  • Alignment should be square. Yes, square.
  • Ball position is centered to slightly forward.
  • Weight distribution is slightly favoring the front foot.
The Proper Set Up...

The Proper Set Up...

Key #2: Wrist Action

  • Wrists should be relatively quiet in the backswing.
  • Avoid excessive cupping in the lead wrist. The left wrist for you righties out there.

Key #3: Body Pivot

  • Keep the chest rotating through the strike in order to shallow the attack angle.
  • Extend the lead side through impact.
  • Avoid thoughts of "stay down", "hit down" or "pinch the ball".

As you work towards better technique be aware that your results are not going to transition from bad to good instantaneously. Taking ownership of the upgrades will take time and patience. Get the set up correct, use the wrists properly and shallow the angle of attack with good chest rotation. Now we're talking!

If you'd like to learn more about improving your wedge play check out the Wedge Project.


No More Weak Iron Shots

We've all heard the sound. And we've all felt it too. That sense when you literally melt a ball off the clubface and you know instantaneously that you've hit the shot you've been waiting for all day. That feeling is compression! To learn more watch this....

Here is an example lesson where I felt it appropriate to use this drill with a student who was struggling with the quality of his strike and high, weak ball flight in particular. Here is his initial TrackMan data for a typical 7 iron shot...

It's important to be aware that the height of this particular shot was 103 feet! This player's club speed is only a few mph short of PGATour average, yet he is only carrying a 7 iron 145 yards. After working on his compression (spin loft) via the drill illustrated in the video this is what a typical shot looked like in drill mode (note the slower club speed)...

The exact same ball speed with more than 7 mph less club speed! The spin loft, which is not an easy change to make, has gone from 31.1º to a slightly low 24.8º and the height has come down to a more manageable 76 feet. I anticipate that as this golfer works to get comfortable with their new feel they would increase their compression to a more appropriate 26º or 27º.

Before on the left and while doing the Compression Drill on the right

Before on the left and while doing the Compression Drill on the right

Thanks for reading and for greater understanding on what compression really is please read:

 Compress the Golf Ball — Andrew Rice Golf

Swing Pattern vs Strike Point

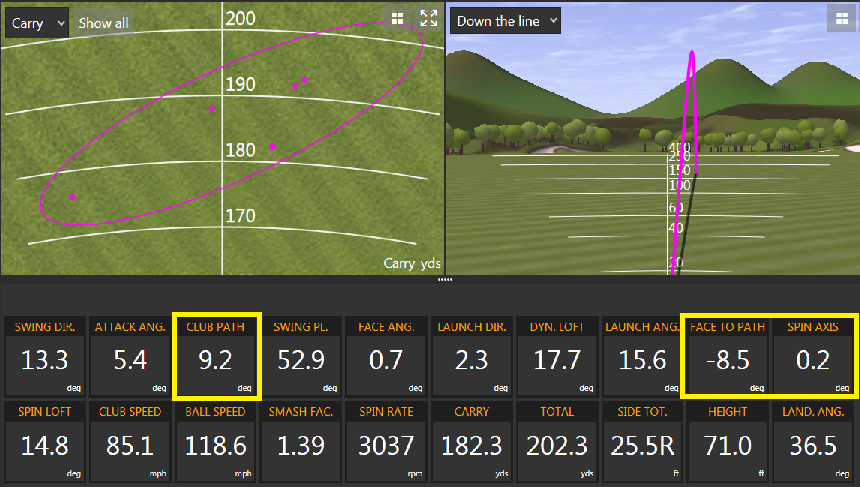
You may have heard me talk about how common it is to see golfers hit a tee shot with a fade (out-to-in club path) swing pattern, yet strike it off the toe for a baby draw or vice versa. The other day I was giving a lesson and a student hit a shot that was too interesting to not share. Here are the TrackMan details of the driver shot:

trackman heel hit

First a few basics:

  • Club path is primarily responsible for the curve of any shot
  • The direction of the club path relative to the target, out-to-in (fade pattern) or in-to-out (draw pattern), is what I refer to as a players swing pattern
  • Players that swing from in-to-out will tend to hit draws and players that swing from out-to-in will tend to hit fades
  • Where the ball is struck on the face of the driver (strike point) can drastically alter the effect of a players swing pattern on ball flight
  • Shots struck off the heel will tend to fade more or draw less and shots struck off the toe will tend to draw more or fade less

The player who hit the above shot has a fairly strong draw bias to his swing pattern and we are always working to neutralize his strong in-to-out club path as he tends to struggle with blocks and hooks. As you can tell from the above shot the club path (first highlighted yellow box) was strongly from in-to-out - 9.2 degrees to the right of the target. Well then why did the ball fly straight (spin axis 0.2)

The particular shot we're looking at was struck well off the heel (yellow circle) and essentially what happened was the draw bias of the swing pattern was cancelled out by the fade bias of the strike point. Notice how in the second yellow box above there's a closed face to path relationship, which should lead to a hook, but the ball flew straight - always a dead give away for a heel strike.

I've come up with a simple formula to help explain this:

A + B = C 

Where A is the swing pattern, B is the strike point and C is the resultant ball flight. You see it's the combination of A and B that gives us the ball flight - not just A. Here's a video I did with TrackMan that might help to explain some of this more clearly:

TMU Master Andrew Rice takes us through what he calls "swing pattern versus strike pattern". Most avid golfers have a consistent swing pattern (club path) but it's usually their strike pattern (impact point) that causes differences in ball flight.

When you're practicing driver you should always mark the face with some Dr. Scholl's Odor X foot spray. If you do that you will always get B (strike point) and C (ball flight) from any shot. Should you be practicing without a TrackMan you'll at least have a clear idea as to what your swing pattern is and can make well-informed adjustments if necessary.

All the best and thanks for reading.


Form vs. Function

Long ago I came to realize that much of modern day golf instruction is based primarily around instructor style preference. Way too much of the information being peddled is form based instead of being function based. Tommy 'Two Gloves' Gainey's win this weekend on the PGATour illustrates that there is more to a golf swing than simply what meets the eye.

In studying the top golfers of all time - no two swings are alike. Who is to say that Ben Hogan's flat plane is better than Jack Nicklaus' vertical arm move? Who is to say that Sam Snead's slight over the top move was better than Nick Price's drop down transition?

Ultimately it all comes down impact and physics - the forces and angles you are causing the club to impart on the golf ball. Impact is the one position in which all of the great players are decidedly similar. From Patty Berg to Annika and Tom Watson to Phil Mickelson - all these players assume a very similar position at impact. If this is the case, which, trust me, it is, then the appearance of the swing should play far less of a role in a golfer's path to improvement.

Here are the elements of a great impact position with irons:

  • the weight is noticeably on the front foot; 80% or more
  • the handle always leads the clubhead
  • the head remains over the ball, while the hips have shifted to the target; this creates what I refer to as body 'curve'
  • the clubhead travels down (downswing) into the ball; this includes fairway woods and hybrids

Here are two short videos to help:

The next time you take a lesson make sure your teacher works towards getting you into a better position at impact. It is the only way you are going to start hitting better, more compressed golf shots.

Can You Get Better in 20 Minutes?

I recently ran an interesting promotion where I offered golfers an opportunity to gain 10 yards if they participated in a twenty minute TrackMan session. The cost was $50 and if they didn't gain the yardage their session was free. This meant I had to be on my game and I had to make simple and effective upgrades to get paid...it's not often a golfer can take a lesson and only have to pay for the lesson if they see immediate results!

My reason for running the promotion was primarily to create interest and excitement in the new TrackMan unit and to give the Berkeley Hall membership a peek at what this technology can do for them.

I had eighteen golfers, eleven men and seven ladies sign up and I encouraged each of the participants to focus on the driver. In case a participant wanted to work with an iron I had them each bring their driver and a seven iron along.

When hitting the driver I try to get my students to have an attack angle of somewhere from 1 - 5 degrees up along with a club path of somewhere from 1 - 5 degrees from in to out.  I prefer that most golfers hit out and up on the ball creating a high launch, low spin trajectory with the driver. We all could benefit from a few extra yards, no?

Here is a compilation of points of interest from the day:

  • The average swing speed for the men with the driver was 83.9mph. The top speed achieved was 96.1mph while the slowest was 70.1mph. Keep in mind that this event was promoted as a "distance" event and as a result the golfers who came out tended not be the longest of hitters.
  • The average speed for the ladies with the driver was 65.6mph with the top speed being 73.4mph and the slowest being 60.3mph.
  • Before any changes were made 11 out of the 18 golfers hit down on the ball at an average of 1.6 degrees with the driver.  After the changes had been made the same 11 golfers averaged 0.6 degrees up on the ball. Not bad...
  • Before any changes were made 7 golfers (a surprisingly low number in my opinion!) hit from out to in at an average of 3.3 degrees with the big stick. This means that their club path was travelling 3.3 degrees left (for a right hander) of the target at impact. After adjusting, the same 7 golfers averaged 0.8 degrees from in to out - a very positive change.
  • Prior to any changes 4 golfers hit too much (in my opinion) from in to out at an average of 6.6 degrees. After the changes they averaged 2.2 degrees in to out - a far more respectable number.
  • Not every golfer gained yardage, although the majority did.  A few golfers actually lost some clubhead speed while they were working on the changes which were primarily in the address position.  It was interesting to note how some golfers adapted and changed easily while others had a tough time.
  • The golfers with slower swing speeds tended to be more efficient, something I had already noted from the PGA Tour stat on Total Driving Efficiency and as a result it was quite difficult to get them make the "required" yardage gains. They were quite close to optimal already...
  • Similarly, I found the ladies to generally be more efficient in transferring the energy they created to the ball than the men. I've also noticed that LPGA golfers also tend to be more efficient than their PGA Tour counterparts, particularly with the driver. The mantra seems to be "the more energy you create, the more likely you are to waste it!" It does not have to be that way though.
  • Every golfer who attended the event improved in an important area regarding how they deliver the club to the back of the ball. Quite a few golfers did not gain 10 yards, but they all left feeling like they had the knowledge and feel they needed in order to realize longer tee shots.
  • One lady had a fantastic golf swing with very efficient numbers, but, primarily due to her petite size, she was unable to generate much clubhead speed. She had an older, heavy driver with a 70 gram shaft and so I spent most of our time talking to her about what equipment (lighter = faster) suited her best and what exercises (Momentus woosh) she could do to increase her speed with the driver.  I'll be interested to see how she does with the new club.
  • Almost all the participants commented that while the "numbers overload" from TrackMan was overwhelming at first, once we had isolated a particular problem (attack angle, club path, spin axis etc.) it seemed very simple. They were able to key in on one area and get a feel for how much change was required in order to reach their goal - all without much in the way of complicated, positional swing changes.
  • The twenty minute time format worked well for the students and for me. They did not get overloaded with information and I had be concise and clear (for a change!) in what they needed to upgrade.

So, back to the question, "Can you get better in twenty minutes?" I would have to say an emphatic yes. With the right feedback mechanism, which TrackMan certainly is, and a simple approach, you can make fairly substantial changes in a short period of time. The important thing moving forward is that you practice the changes in order to gain a measure of comfort and confidence in them - and as we know, that takes more than twenty minutes.

Thanks for reading.