A Drill for Better Strikes & Trajectory

This is a fairly straightforward drill that will activate the trail side in the downswing and reduce any “tipping” tendency that might get the clubhead stuck behind the golfer. If you struggle with thins, and fats in tandem with blocks and hooks, then this is one for you to try.

A few points to note:

  • This drill works nicely with a 7 or 8 iron struck off a low tee.

  • Keep the stance fairly narrow and drop the trail foot back about a foot inside where you’d normally place it.

  • Rehearse and then rehearse again. Remember that as you practice this you’re trying to make technical changes, so go slowly and get it right….every time!

  • Try to feel the trail shoulder continuously moving through the impact zone. It should feel as if you’re “covering” the ball with that trail shoulder.

  • As you get more comfortable you can start to pick up the speed and move the back foot into a more neutral position.

This drill really has worked wonders for a few of my students in that it has upgraded both the quality of strike along with the ball flight. The next time you find yourself struggling with either strike or trajectory give this drill a try. I think you’ll be pleasantly surprised.

A Strict No Tipping Policy!

We’ve all been there - a constant battle between fats and thins, blocks and sweeping hooks! This malady is something I experience all too often on my lesson tee and I have an idea that I know will help many of you. Once you work your way through this article your approach to ball striking, your concept of how it should work, will never be the same again. Take a look…

I have come to believe that the primary culprit in tipping the upper body back is the quest to work the clubhead back to the inside or shallow the club on the downswing. I’ve written that “It’s All About Impact”, but you can only arrive at an appropriate impact when certain elements are in place going back and on the way down. The better the clubhead is positioned in the early downswing the less likely golfers are to tip their shoulders and spine away from the target too early.

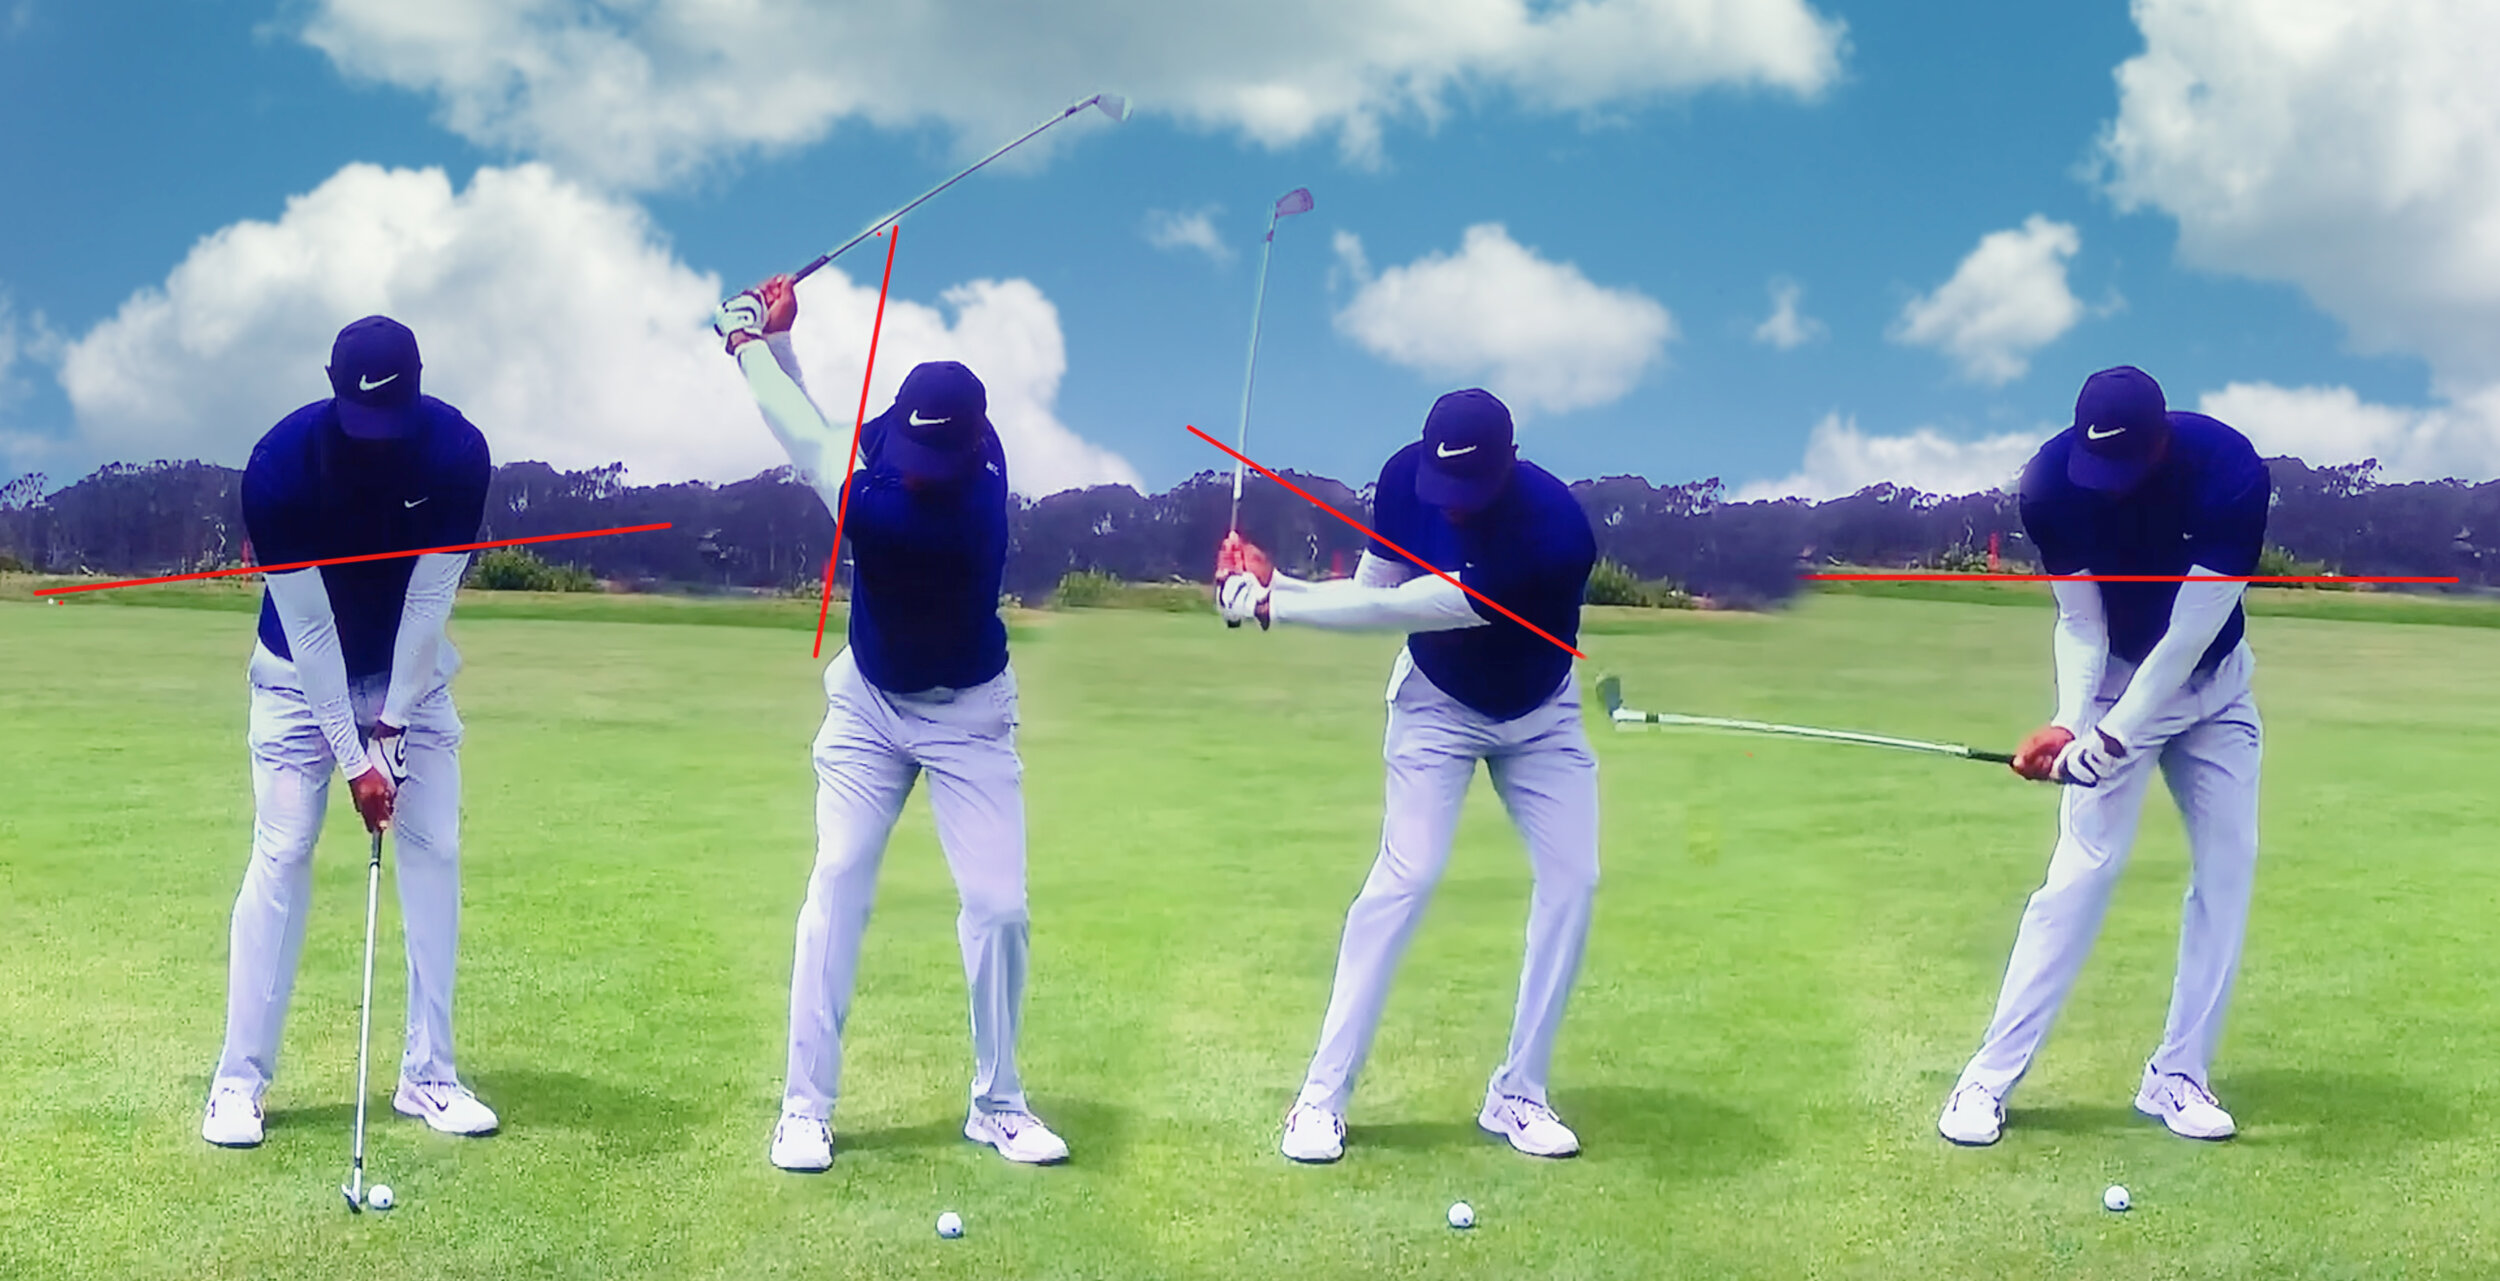
Here’s a face on shot of Tiger Woods from the PGA Championship in San Francisco. I like this example as the bottom of his sleeves seem to correlate to shoulder tilt in these frames.

Tiger Woods

Tiger Woods

Frame 1: Far too many golfers have significantly more shoulder tilt than this at address. The lead shoulder should always be higher, but only marginally.

Frame 2: It’s amazing that Tiger can turn this well after his back issues. That being said, notice how much higher the trail shoulder is than the lead. He has turned well, but perhaps more importantly, he has pivoted on a fairly steep incline with the shoulders.

Frame 3: The inclined pivot going back has aided his ability to initiate the downswing without a hint of tipping away from the target. The weight is left and the body is rotating appropriately.

Frame 4: A great checkpoint for all golfers - make sure that just before the shaft gets back to parallel to the ground, your shoulders (or sleeves) are pretty close to parallel to the ground as well. From here the low point of the arc is well forward of the ball and the player can rotate freely through impact, aiding with club face control. Better ball striking and accuracy!

Get out to the practice tee and make a few exaggerated practice swings as I demonstrated in the video above. It will, and should, feel strange, but straight away you’ll notice how the low point to the swing is now after impact and you can rotate more freely through the strike. Give it a go and let me know your findings.

Thanks for reading!

Let's Get This Straight!

If you, as most golfers do, struggle with consistency then this article is for you. We all do really! The number one culprit for off target shots is the club face being misaligned at impact. We struggle to control the face through the strike. This simple video will give you some insight as to how you can start to do a better job. Keep in mind we’ll never be perfect, but we can be better. Watch…

Far too often I see golfers consciously trying to swing down the line. This forces the hands out and necessitates a flip through impact. You can hit good shots with a flip, just not enough consecutive good ones to play well for all 18 holes.

Here are a few keys:

  • Work the handle around the lead hip through and post impact. It turns the corner

  • The clubhead should arc back inside the flight of the ball very soon after impact whether you’re hitting draws or fades

  • Don’t be afraid to keep the club face relatively quiet, particularly if you struggle with blocks and hooks

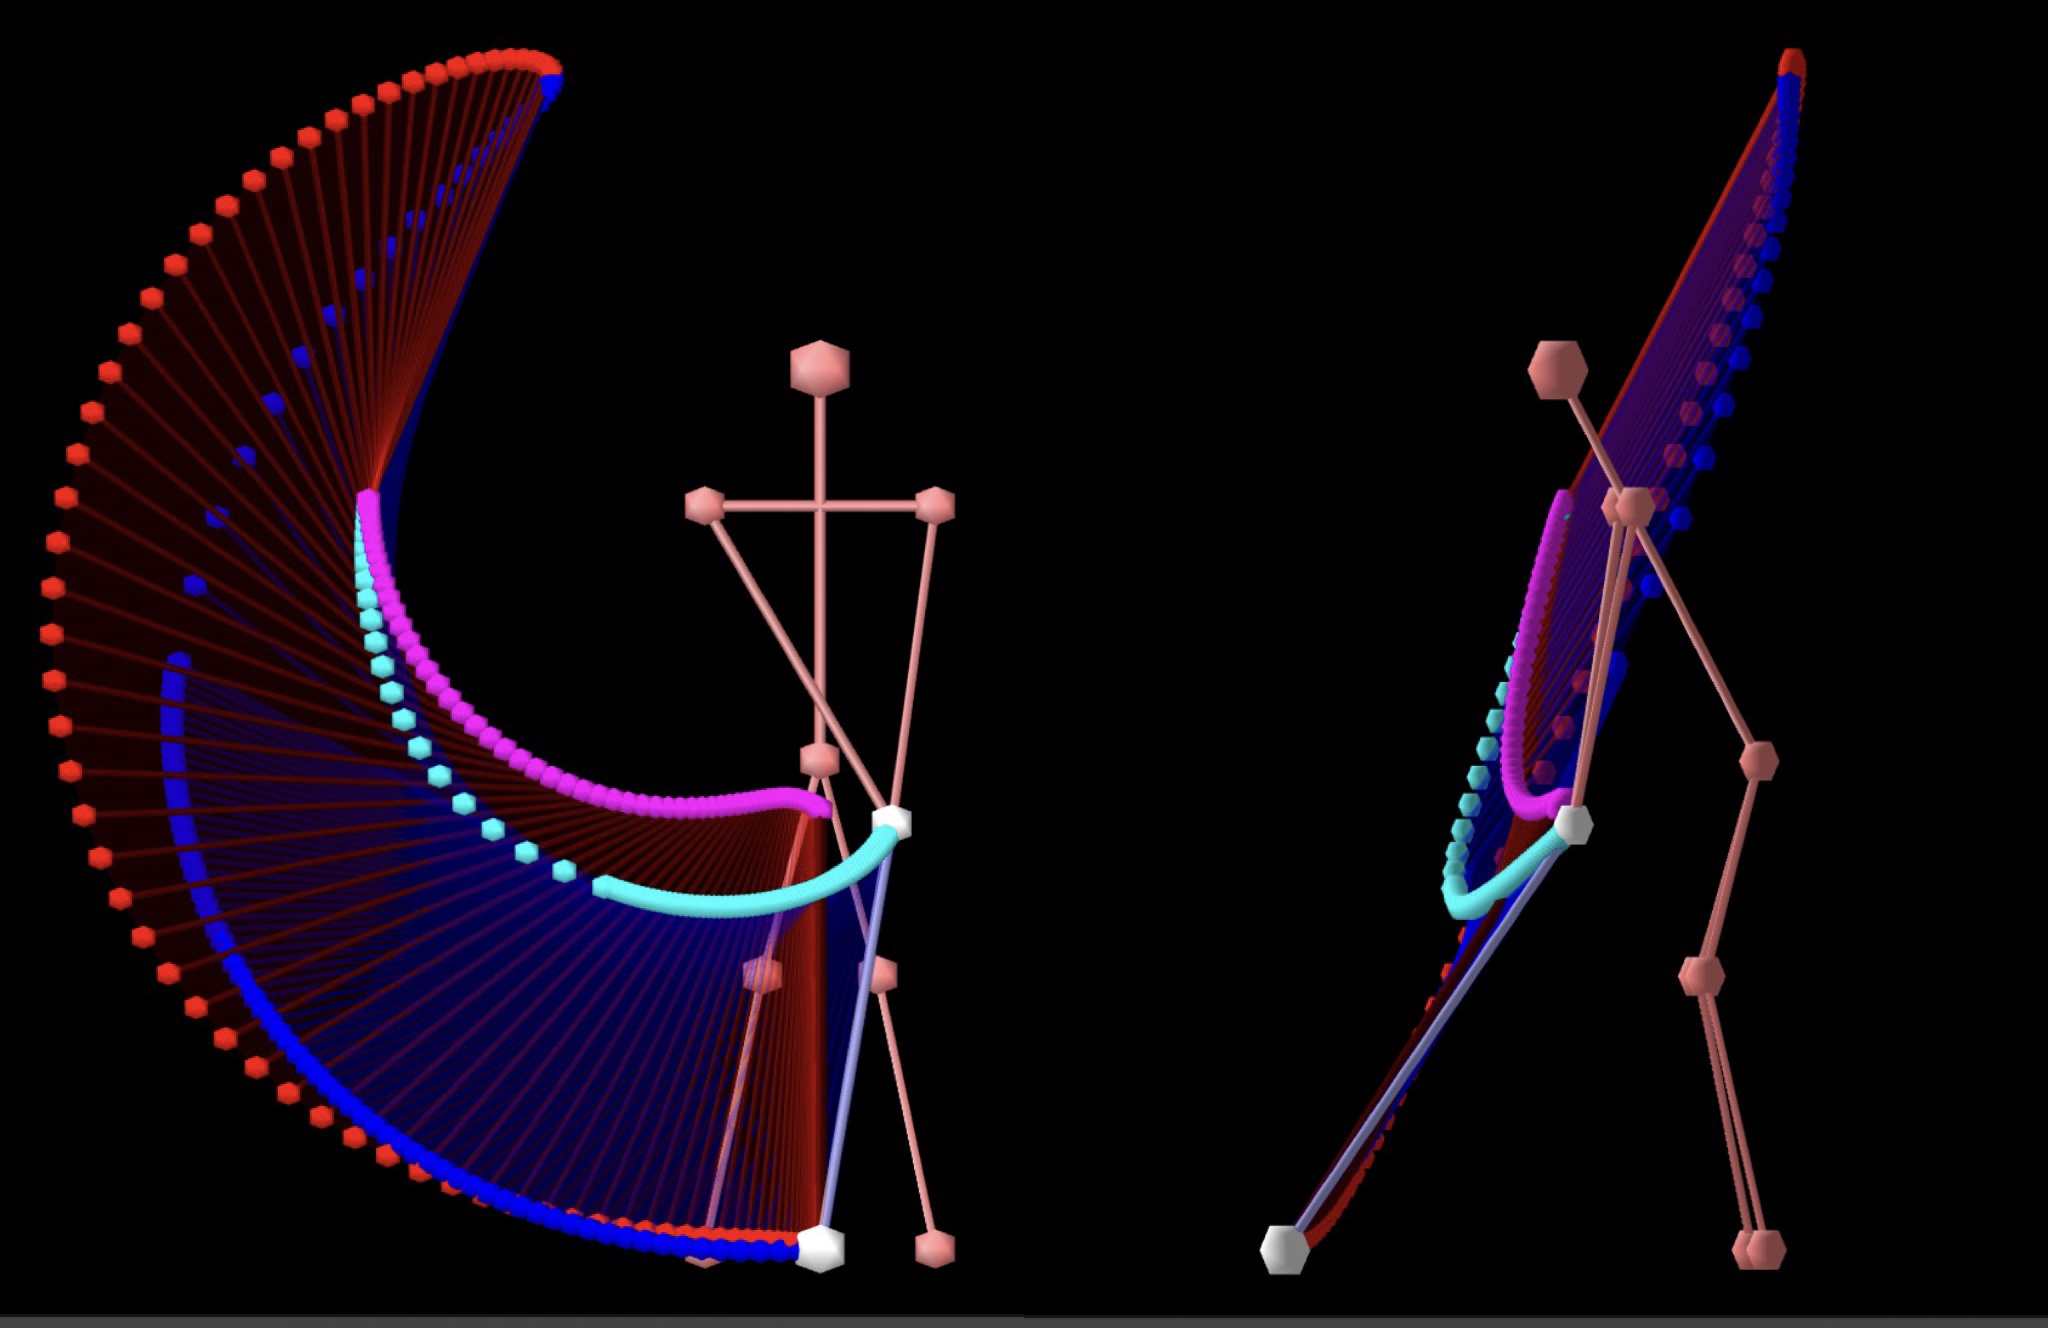
Here is a simple half swing I made with a seven iron using a ClubHub sensor that clearly shows how the handle (light blue line) tracks inwards (and upwards) during the impact interval.

ClubHub 3D Track

Get to the range, start with the small shots I demonstrated and I believe you’ll very quickly gain a sense of how this works to quiet the club face through that all important strike zone.

Thanks for reading.

Should you be interested in getting together for some work on your golf game click HERE.

How to Stop Hooking

There are literally thousands of articles pertaining to getting rid of slicing or fading the golf ball, yet not much sound information to help golfers overcome hooking (and blocking)!

The video clearly illustrates what the primary causes are...

The dispersion drill will not only get you to improve the club path, but also encourage you to get the clubface pointing to the right of the target. Exactly the opposite of what you have been struggling with! With the feel from the dispersion drill you will no longer have the:

  • club path traveling too far from in to out
  • clubface closed to the path
  • have to rely on perfect timing to quality golf shots

Give this simple drill a try if you tend to struggle with blocks and hooks. If you enjoyed this video and article please share it with a friend who you feel might benefit from it.

Thanks for tuning in!


A Better Downswing to Reduce Blocks and Hooks

As we all know most golfers tend to struggle with fading and slicing the ball, but there is a large portion of the golf population, typically lower handicap players, that struggle with hooks and the occasional block. This article is for you!

There's a huge correlation between between a golfer's club speed and their handicap. The higher the speed, typically, the lower the handicap. The key is being able to manage the golf club while generating higher club speeds and that can only happen with a proper pivot and more specifically, a proper downswing pivot. Here's how...

As you begin your downswing you want to feel the following:

  • The weight remaining on the trail foot for longer
  • Cast your net! More rotational and less lateral
  • The legs separating slightly
  • The handle of the club working out or in front of you while the clubhead stays behind you

The objective here is to get the clubhead traveling less outward and along a more neutral path through impact. Getting your body to rotate on the way down in more of a 'merry-go-round' fashion and less of a 'ferris wheel' fashion will deter the clubhead from getting too far to the inside.  

Try this feel slowly and with soft shots before working up to full swings. You'll be amazed at how challenging it is to actually stay back and rotate versus driving forward. Stick with it and realize that in order to improve the quality of your shots you're going to have to improve how the clubhead communicates with your golf ball.

Thanks for reading and if you have a friend who you feel might benefit from this information please share! 

Understanding Shot Shape

Please watch....

I have never taught a predominant slicer that did not always have their clubpath travelling from out to in on a very consistent basis. I have never taught a predominant hooker that did not always have their clubpath travelling from in to out on a very consistent basis. In order to upgrade these golfers' ball flight we needed to improve their path first and then work to adjust the face to point somewhere between the path and the target line.

Here is an example of a lesson I might give to a golfer who predominantly fades/slices the golf ball:

I hope these two clips help you to better understand what it is you need to do to improve your ball flight and have more fun out on the golf course.

How to Stop Flipping - Guaranteed!

Ben Hogan once said that he despised any ball flight that curved from right to left (a draw!). Having been a chronic hooker of the ball in the early part of his career he knew what it was like to lose shots to the left. It wasn't until he found a way to overcome the dreaded flip through impact that the legend that is now Ben Hogan was created.

If you too struggle with untimely hooks and occasional blocks, you fully comprehend what Mr. Hogan had to overcome. Flippers have to rely on timing to make their shots go straight - the timing of the hand action through impact determines the outcome of each shot. And when impact between ball and face lasts for approximately 1/2000 of a second it's not that easy to be consistent - especially under pressure! The better you play, the greater your anxiety level, the less you control the timing of the flip - not a good recipe for low scores when it counts.

Having studied the swings of Hogan and Snead I found that when viewed from down the line it appears that the clubhead and ball seem to disperse aggressively post-impact. The clubhead moves quickly back inside the target line, while the ball launches straight. It almost appears as if they are trying to hit slices, yet the ball flight is very straight.

Watch the following video to get a sense of what to feel while doing the Anti-Flip Drill:

To practice the drill you will need the following:

  • Two alignment rods - one on the ground just outside the ball and another in the ground just inside the target line and 18-24 inches forward of the ball. Be sure that the one in the ground is leaning away from you (towards the target).
  • A 7 iron with the ball teed up so you can make sure it is in the same location relative to the rod in the ground each time.
  • Start small and slow, making sure you swing inside the rod with the clubhead and keep the face square to open thus launching the ball to the right of the rod.
  • Patience! Give it a few goes and you'll start to get the feel. Feel the clubhead and ball dispersing - one goes left and the other goes right. Remember that you have not been doing this "naturally" and that's why it feels so strange and "incorrect".

Here is the drill demonstrated in slow motion: