The Art of Being Skillful

As many of you know I enjoy deciphering which elements contribute to being a great wedge player. Ever since I started with my 'Wedge Project' research in 2010 chipping and pitching have really piqued my interest.

My recent testing, and philosophy, has been aligned alongside golfers using one club and applying their skills to control the trajectory and outcome of their shots in close proximity to the green. For ease of illustration and testing I selected a 58º wedge and a 15 yard carry requirement. I then played three different trajectory shots - a high, mid and low shot. I recorded each version in slo-motion and at regular speed along with running TrackMan in the background to capture data on a handful of each type of shot.

As you can tell there is a dramatic difference in the pace required to execute each intended trajectory. The technical changes for each shot changed as follows:

High: ball positioned off front big toe, face square at address and a sense that the handle slows dramatically approaching impact as the clubhead passes the handle prior to impact. Freddie Couples is a good image here.

Mid: ball positioned centrally, face square at address, medium pace and a sense that the shaft will be vertical at impact.

Low: ball positioned off the back big toe, face square with hands forward as a result of the ball position and an upbeat pace that encourages the handle to 'beat' the clubhead to the ball at impact. Zach Johnson's brisk pace comes to mind with this type of shot

At Impact

At Impact

The TrackMan data provides some interesting differences:

Club Speed: Low 23mph; Mid 30mph; High 37mph

Ball Speed: Low 27.8mph; Mid 28.5mph; High 28.0mph

Smash Factor: Low 1.2; Mid 1.0; High 0.8

Launch Angle: Low 29.6º; Mid 40.6º; High 51.6º

Spin Rate: Low 2230rpm; Mid 1630rpm; High 1250rpm

One thing that struck me was that the average ball speed was the same for each type of shot, yet the club speed was very different. The attack angle was steepest with the lower shot primarily due to the ball position and the shaft lean. I also found it interesting that there was roughly 10º difference in the launch angle of each version.

The numbers might be important for coaches to understand, but what can you, the player looking to save strokes take away?

  • Stick with one club around the greens - you'll become a skilled artisan with it in your hands.
  • Alter the trajectory with subtle changes at address and less subtle changes in the pace.
  • The manner in which you release the clubhead through impact will make a big difference
  • Now get to work!

Thanks for reading and please share with a friend. Happy New Year and all the best for a fabulous 2018. #birdies

You Need More Power

Yes! Don't we all? As with all things in life some things are easier said than done and this is no different, but it IS possible. Have you heard about using the ground to generate more power? This is what I'll be addressing in this article - pushing off the ground in order to generate greater club speeds and longer shots. Take a look...

So here's what we're looking for just prior to starting the downswing:

  • The trail knee maintains its position as the golfer starts the downswing. Just for a little while...
  • The lead side separates as the player glides into their front side. This creates some leg separation.
  • There should be a definite lowering or unweighting in the early downswing.
  • The late downswing should be characterized by an upward thrust away from the ground.

Notice in the image below how in the early downswing my belt buckle is significantly lower than it is half way through the follow through...

Image 11.JPG

This is something that all long drivers take full advantage of - that ability to really thrust up from the ground and in most cases actually push both feet off the ground. It's that push that will help to really get the clubhead moving. 

Thanks for reading/watching and if you have a friend who would really benefit from this information please share it.

My 3 Keys to Great Wedge Play

If you dread any form of pitch or chip shot then this article is expressly for you. If you feel like you could save a few more strokes around the greens then this article is for you. Utilizing better technique will literally make these shots easier. Here are a few straightforward improvements that will get the job done. Watch...

Key #1: Set Up

  • Feet should be close together. The most common mistake I see is a stance that's too wide.
  • Alignment should be square. Yes, square.
  • Ball position is centered to slightly forward.
  • Weight distribution is slightly favoring the front foot.
The Proper Set Up...

The Proper Set Up...

Key #2: Wrist Action

  • Wrists should be relatively quiet in the backswing.
  • Avoid excessive cupping in the lead wrist. The left wrist for you righties out there.

Key #3: Body Pivot

  • Keep the chest rotating through the strike in order to shallow the attack angle.
  • Extend the lead side through impact.
  • Avoid thoughts of "stay down", "hit down" or "pinch the ball".

As you work towards better technique be aware that your results are not going to transition from bad to good instantaneously. Taking ownership of the upgrades will take time and patience. Get the set up correct, use the wrists properly and shallow the angle of attack with good chest rotation. Now we're talking!

If you'd like to learn more about improving your wedge play check out the Wedge Project.


A Sample Golf Lesson

I wanted to share a recent lesson I did. Keep in mind that that this lesson went completely as intended - it doesn't always work that way. My objective for Halle, who is a promising young high school golfer, is to improve the quality of her ball striking. Watch...

She improved her posture by not extending her lower back as much and her swing notes were:

  • Feel the hips working more up and down vs level - Sam Snead image. This would serve to improve body motion and discourage the arms from working behind her too much.
  • Consciously keep her arms more in front of her. A drill was to make back swings while backed up against a wall. This would keep her arms from getting deep and allow them to work in front of her on the way down.
  • Sense the hands tracking left of the target through impact. She has worked on the dispersion drill in the past and has had good success with it.

Hand path is often over looked and is an important part of what I teach on a daily basis. Thanks for watching!

This free website's biggest source of support is when you decide to book a lesson or golf school. You can contact me HERE. If you live in another state or country please consider making a purchase HERE or  HERE. It will help your game in addition to helping me to keep adding to this free website. Thanks again for your support! Andrew.

How to Shallow the Shaft

For most golfers this is a biggie! If they can manage to get the shaft to shallow or flatten in the early stages of the downswing their chances of drawing the ball, along with a consistently crisp strike are greatly improved.

There are a few key factors to implement that will firm up your ability to shallow the shaft in transition. Watch...

My three important keys are:

  1. A flat lead wrist at the top of the backswing. If you can shoot in the 60's this is not imperative, but it will make the job of flattening the lead wrist in transition and the downswing that much easier.
  2. Get the shaft either straight or laid-off at the top of the backswing. Where you point the handle ultimately determines where the shaft is angled and it's much easier to manage it this way.
  3. Allow the hands to travel out or in front of you slightly as you start down. Be careful you don't over do this, but there are few things worse than getting the hands tucked in behind you in the downswing.
Woods, Trevino, Pettersson and Snead

Woods, Trevino, Pettersson and Snead

In the above image Tiger displays a flat left wrist and a slightly laid-off shaft, Trevino has shallowed the shaft and has a flat lead wrist, Carl Pettersson really gets his hands to travel out at the start of the downswing and Snead follows suit. All positive swing elements to emulate.

I would recommend you start your quest to improve this important swing factor in front of a mirror. Get a feel for each of the three keys by watching them and "seeing" what they need to feel like and then you'll be free to head out to the practice ground.

This free website's biggest source of support is when you decide to book a lesson or golf school. You can contact me HERE. If you live in another state or country please consider making a purchase HERE or HERE. It will help your game in addition to helping me to keep adding to this free website. Thanks again for your support! Andrew.

Coach Camp 2016

I am so excited to get the word out about this coaching event! For professional coaches and teachers only, Coach Camp 2016 will take place at Berkeley Hall in Bluffton, South Carolina on February 22 and 23, 2016. This will be two days of industry leading coaching information designed to positively enhance the course of your career.

The event is being sponsored by True Spec Golf, an innovative custom club-fitting operation that all golf coaches should know about and SwingCatalyst, the premier balance plate and 3D motion plate company in the game today.

Each presenter will be given an opportunity to discuss a topic of their choosing and there will be "panel" style discussions on wedges, driving, how to grow your business and even a lesson where each featured coach will share their thoughts on improving the same golfer. Something different and interesting!

Dinner on the 22nd is going to be special as Dr. Morris Pickens will share a few of his experiences being with Zach Johnson at the Open Championship at St. Andrews earlier this year.

Please be aware that this event is only open to 55 participants. For full details or if you'd like to register go to www.CoachCamp2016.com.

If you have any questions or would like to discuss sponsorship details please contact us HERE

I'm so looking forward to it and I sincerely hope you can attend!

Optimal Driver Numbers

kyle stanley
kyle stanley

We would all like to drive the ball longer off the tee, yet far too often golfers search in all the wrong places to find more distance. There are three primary factors that will help you hit the ball further: a well fitted golf club; a stronger, more flexible and ultimately faster you; and a swing that delivers the clubhead to the ball in a manner that maximizes the force you are putting into the swing -  what I like to call efficiency. Where you get out what you put in. Here's a great example - on the PGATour David Toms swings at 104 mph and Stephen Gangluff swings at 120 mph, yet they average the exact same distance off the tee....hmmm?

Efficiency is the big fish and the area where most golfers can make the greatest gains. With this in mind I created (with the help of TrackMan) a chart that I like to use to show golfers how far they are capable of hitting the golf ball with their current club speed. The chart ranges from swing speeds of 65 mph to 105 mph and assumes no wind, flat terrain, normal ground conditions, sea level and  premium type golf balls. These distances can only be attained with an upward attack angle (+5 degrees) and fairly low spin rates - somewhere between 1900 - 2200 rpm.

Club Speed     Ball Speed     Launch Angle     Carry (yds)     Total (yds)

65 mph             96 mph            16.5                     136                    182

75 mph             111 mph           15.6                     157                    208

85 mph             126 mph           14.6                      193                   242

90 mph             133 mph           14.2                      209                   256

95 mph              140 mph           13.7                      225                   271

100 mph            148 mph            13.2                     242                   286

105 mph             156 mph           12.6                      259                   303

Keep in mind that the above numbers are achievable, but only in a 'best shot' type scenario. David Toms was the most efficient driver on the PGATour in 2012  and at 100 mph he would have averaged 278 yards per drive - very good for an average. Regardless of what our swing speed is we are all capable of this highly efficient delivery of energy from club to ball.

How helpful can this chart be to you? If you're a golf coach with TrackMan technology you can benefit from it immediately. As a golfer you would need to have a rough idea of what your club speed is followed by an honest assessment of how far your ball is travelling in neutral conditions. If you're noticeably shorter than you should be, seek out the nearest golf coach with a TrackMan and get to work.

You may have heard the term high launch, low spin....well, it really is what you should be after off the tee box.

Additional Resources:

Getting More Out of Your DriverAndrew Rice Golf

Hitting Up or Down? Here's How to Set UpAndrew Rice Golf

Which Driver Shaft Length?

testshaft
testshaft

When I tested my old college driver a few weeks ago my interest was piqued by how close my swing speed with the 43.5 inch club was to my current 45 inch driver. I have heard that altering the shaft length of your driver by an inch can/should alter the club speed by up to 4 mph. This called for a test.....

Using TrackMan my idea was to test the same golfer, clubhead and golf ball, but change the shaft length. I took my current driver, which is the Titleist D3 8.5 degree (B1) with a 45" Motore F3 70 gram stiff shaft and tested it alongside the same head (B1) with a 43" Project X 82 gram stiff shaft. Essentially a driver shaft versus a 3 wood shaft. I had recently came across a 42.5" well kept old Wilson Staff JP persimmon driver with a steel shaft and decided to include that in the testing.

persimmon
persimmon

I hit 11 shots with each club and eliminated the data for the poorest shot with each club. I was using fresh Titleist NXT Tour golf balls and it was a perfect 80 degree day with little wind. The results were astounding!

With all three clubs my tendency was to hit up on the ball with a slight in to out club path. My swing plane was very consistent from shot to shot (which surprised me a little actually) and the clubface was almost always slightly open at impact. This path and face relationship led to an average shot shape of a slight draw. Here are the numbers:

45" Driver Shaft

  • Club Speed 101.3 mph
  • Ball Speed 151.6 mph
  • Spin Rate 2697 rpm
  • Launch Angle 11.3 degrees
  • Carry 245 yards
  • Total 272.2 yards
  • Height 76 feet

43" Three Wood Shaft

  • Club Speed 101.1 mph
  • Ball Speed 150.0 mph
  • Spin Rate 2100 rpm
  • Launch Angle 14.0 degrees
  • Carry 249 yards
  • Total 278.7 yards
  • Height 84.3 feet

42.5" Persimmon Driver with Steel Shaft

  • Club Speed 93.4 mph
  • Ball Speed 141.2 mph
  • Spin Rate 2115 rpm
  • Launch Angle 10.3 degrees
  • Carry 206.4 yards
  • Total 246.4 yards
  • Height 48 feet
shafttestavg
shafttestavg

I couldn't believe it! I hit my driver with a 3 wood shaft further, higher, with less spin and above all else - straighter. Take a look at how much straighter: (yellow - driver shaft/purple - 3 wood shaft/ white - persimmon)

dispersion
dispersion

I also totaled the distance (after roll) the ten shots with each club finished from the center line:

  • Persimmon - 182 feet (average 18" off line)
  • Three wood shaft - 234 feet (average 23" feet off line)
  • Driver shaft - 315 feet (average 31" off line)

On my Andrew Rice Golf Facebook page I asked readers if they had any experience with shortening the shaft of their driver and here are a few of their responses:

"I just went to a 44" and am loving it! Longer then my 45.5" and straighter too!" GT

"Went to 44" and more consistent with no loss in distance" AvS

"44" Callaway...more fairways AND more distance!!!" CL

"Went to 44" and I hit it more solid further and straighter" PW

"44" this year. I agree it is far better. Middle of the face more often." SF

"I found it made me less steep through attack so I have lowered my spin rate and launched it about a degree higher" AB

By the way - most of the above quotes are from full-time professional golf instructors. So what can we learn from this research?

Having tested a few golfers with shorter shafts it seems to me that each golfer has a 'threshold' length - an ideal length that gives them the optimal combination of speed and accuracy. For some that threshold could be 46"  while for others they perform best with a 42" driver. The only way to find out is to get yourself with a teacher or fitter that has access to Trackman and various shafts.

Another point to note is that while the 3 wood shaft had a slightly slower club and ball speed the shots were longer...why? Notice how the launch angle was higher while the spin rate was lower. A perfect illustration of the term 'high launch low spin'. Launch the ball higher to get more out of your tee shots.

persimmon1
persimmon1

What can we learn from the 'persimmon' data? While that shaft was even shorter than the 3 wood shaft it was substantially heavier. I believe the 3 wood graphite shaft was almost 50 grams lighter than it's steel counterpart which would explain the almost 7 mph difference in club speed. The size, or lack there of, of the head was intimidating in the beginning, but as I went through the shots I became more comfortable. I believe that practicing with a smaller clubhead like this can only be beneficial in the long term for any serious golfer.

My feeling standing over the shorter club was better and almost every golfer I tested reported the same sense. The club feels easier to control and many golfers have reported a feel that they can 'get through' the shot better. I really felt like I could smash it without it going off line - a nice feeling!

Physics says that longer shaft + lighter shaft = faster club speed = more distance. On paper that might be true, but when the human element is involved everything changes. The next time I tee it up it will be with a substantially shorter shaft in my driver...but that's just me!

The Truth about Divots

Demonstrating the Impact Drag Drill

Demonstrating the Impact Drag Drill

I think divots are over-rated. They are not integral to great ball striking and they certainly don't give us as much information pertaining to the swing that led to the divot as we have been led to think. And to think that I used to love them, I used to encourage all my students, even ladies, to hit down and take divots...

Times have changed! TrackMan has shown me that far more golfers hit down too much than those who don't hit down enough. The "hit down" mantra has been flogged to death.

This video I filmed in conjunction with Revolution Golf will give you some idea as to what to look for as you work towards an improved and shallower strike on the ball.

As Martin Chuck so aptly said in this very good follow up video, "We're looking for bacon strips, not pork chops!" A shallow strike will improve the crispness of your strike - give it a try.

Thanks for reading along.

Prepare to Play Great Golf

In today's fast paced world there isn't enough time to play golf, never mind work in a proper warm-up before you play. With the help of Berkeley Hall's TPI Certified trainer, Derek Lemire, this article isolates a few important exercises you can sneak in before the round to help you better prepare to play some great golf.

Here is a breakdown of the key areas to focus on and suggested exercises to complete:

HIPS

  1. Hip Kick (0:50)
  2. Hip Rotation (1:05)
  3. Hip Tilt (1:35)
  4. Internal Hip Rotation (2:10)
  5. External Hip Rotation (2:25)
  6. Hip Flexion (2:35)
  7. Hip Separation (3:10)

LEGS & SPINE

  1. Hamstring Stretch (3:45)
  2. Lateral Lunge with Rotation (4:30)
  3. Forward Lunge with Rotation (5:15)

SHOULDERS & LATS

  1. Vertical Shoulder Activation (5:45)
  2. Scarecrow/9090 (6:10)
  3. Shoulder Fly (6:30)
  4. Lat Stretch (6:50)

CORE ACTIVATION

  1. Forward Plank (8:00)
  2. Side Plank (8:30)

I would encourage you to select two from each body zone and work towards incorporating them into either your daily routine or at the very least do them before going out to play.

Remember this - if you keep doing what you've always done, you'll continue to be the golfer you've always been! Accept the challenge and commit to the change.


Driver Education

Here's a fun video I filmed in collaboration with Mark Crossfield and Denis Pugh. I believe it covers almost all the pertinent points any golfer should be looking into in order to be able to hit the ball longer and straighter...

I hope you enjoyed this and are keen to get out there and try a few of the suggested ideas and drills to see if you can improve off the tee.

Thanks for watching!

Swing Pattern vs Strike Point

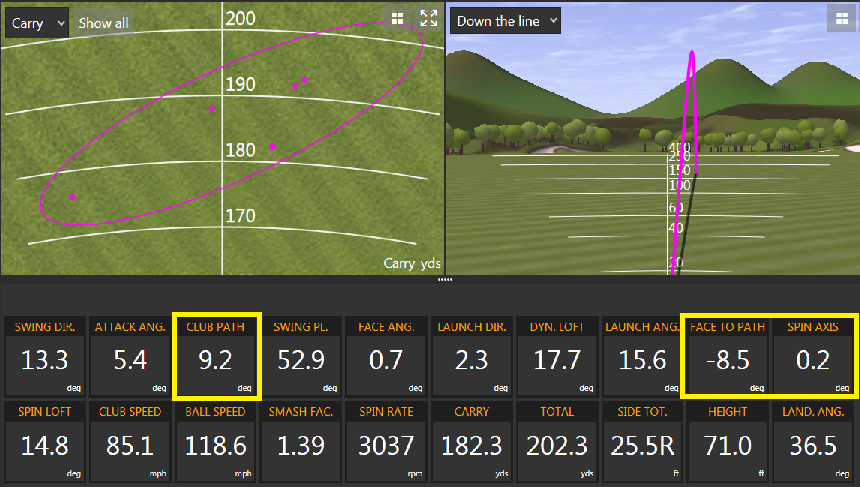
You may have heard me talk about how common it is to see golfers hit a tee shot with a fade (out-to-in club path) swing pattern, yet strike it off the toe for a baby draw or vice versa. The other day I was giving a lesson and a student hit a shot that was too interesting to not share. Here are the TrackMan details of the driver shot:

trackman heel hit

First a few basics:

  • Club path is primarily responsible for the curve of any shot
  • The direction of the club path relative to the target, out-to-in (fade pattern) or in-to-out (draw pattern), is what I refer to as a players swing pattern
  • Players that swing from in-to-out will tend to hit draws and players that swing from out-to-in will tend to hit fades
  • Where the ball is struck on the face of the driver (strike point) can drastically alter the effect of a players swing pattern on ball flight
  • Shots struck off the heel will tend to fade more or draw less and shots struck off the toe will tend to draw more or fade less

The player who hit the above shot has a fairly strong draw bias to his swing pattern and we are always working to neutralize his strong in-to-out club path as he tends to struggle with blocks and hooks. As you can tell from the above shot the club path (first highlighted yellow box) was strongly from in-to-out - 9.2 degrees to the right of the target. Well then why did the ball fly straight (spin axis 0.2)

The particular shot we're looking at was struck well off the heel (yellow circle) and essentially what happened was the draw bias of the swing pattern was cancelled out by the fade bias of the strike point. Notice how in the second yellow box above there's a closed face to path relationship, which should lead to a hook, but the ball flew straight - always a dead give away for a heel strike.

I've come up with a simple formula to help explain this:

A + B = C 

Where A is the swing pattern, B is the strike point and C is the resultant ball flight. You see it's the combination of A and B that gives us the ball flight - not just A. Here's a video I did with TrackMan that might help to explain some of this more clearly:

TMU Master Andrew Rice takes us through what he calls "swing pattern versus strike pattern". Most avid golfers have a consistent swing pattern (club path) but it's usually their strike pattern (impact point) that causes differences in ball flight.

When you're practicing driver you should always mark the face with some Dr. Scholl's Odor X foot spray. If you do that you will always get B (strike point) and C (ball flight) from any shot. Should you be practicing without a TrackMan you'll at least have a clear idea as to what your swing pattern is and can make well-informed adjustments if necessary.

All the best and thanks for reading.


To Mill or Not to Mill?

My three test subjects...

I must be honest and write that I did this test in the hopes of proving a few people wrong. Instead, I have proven myself wrong. With my research for the Wedge Project I put my "stake in the ground" on what I believed regarding milling on the clubface. All the tests I performed using TrackMan and various wedges always showed that a wedge without a milled face generated less spin (albeit slightly) than wedges with the fine "corduroy" look of milling between the grooves.

I looked up a person I believe to be very knowledgeable when it comes to equipment, Tom Wishon. I read all that he had to say on the matter of grooves and surface roughness and his findings aligned with the results I was seeing in my tests.

Based on what I had available to me I had done my homework and had placed my "stake in the sand" in favor of milling on the clubface. It just made sense to me. Until this....

David Neville and the crew from Vokey Wedges have been kind enough to let me have access to a few test wedges. They sent me six wedges of which I chose to use three for this test.

No grooves and no milling

No grooves and milling

All three wedges have the same grip, shaft (DG S200), length, grind (M) and a stated loft of 56 degrees. I did not check their weight, actual loft, lie angle or bounce measurements. I hit 60 shots off a mat (to eliminate ground interference) with the no groove, no milling club and 60 shots off a mat with the no groove, milled club. I then eliminated the 15 lowest spinning shots to leave the remaining 45 highest spinning shots with each club. I used slightly used ProV1X balls and attempted to carry each shot 50 yards. I wiped or cleaned the clubface between every 3rd or 4th shot. Here are the results:

Titleist SM4 TVD M 56 degree Chrome Fly Cut without Grooves or Milling

Titleist SM5 56.10 M 56 degree Raw Surface without Grooves/Milling Only

As you can see the club that had surface milling or roughness actually generated less spin - 6009 RPM to 6229 RPM. While the difference between the two is negligible and most golfers would have a hard time telling the difference between the ball flight of one versus the other (myself included), the result is significant to me in that I firmly believed the outcome would be reversed.

Keep in mind this is a test involving one golfer hitting a limited number of shots to one distance. The results might be a slightly different with multiple golfers at different distances, but I don't believe different enough to sway the outcome of this test.

I recently posted this quote by Martin Palmer on Twitter: "The secret to mastery in any field is to forever be a student." Today my "stake in the sand" moved - I was a student and I learned something. I think it is vital as a coach, or even as a golfer, to place your "stake in the sand" and firmly believe in a method, approach or theory. Stand by it and argue in its favor. That is, until you uncover sound evidence or reasoning against your viewpoint - then you pick up your stake, admit you were wrong and adjust your approach.

As a point of interest I wanted to see how a standard clubface might interact with the ball. I hit 25 shots (keeping the best 20) with the Titleist SM4 TVD M grind that has 17 standard grooves and a milled face. Here are those results:

Titleist SM4 TVD M 56 degree Black Oxide 17 Grooves with Surface Milling

As you can see this clubface with both grooves and surface roughness generated the highest spin rates of all three clubs. This leads me to believe that grooves play a larger, more important role on cleanly struck shots than I originally thought.

As I continue to learn and work towards providing my students with what I believe to be the best current information and knowledge available I know that I will continue to be wrong. The blessing is that each time I am wrong I will learn, adjust and be less wrong than I was before.

Controlling Wedge Shots

Here is a video I did with the help of TrackMan and a student of mine James Willis. This was actually the first time I had seen James pitch the ball and it was nice to see how quickly he hit better shots and improved the flight and spin rate of these important shots.

From 60 yards and in I like to see a dynamic loft of 40 degrees, a launch angle of less than 30 degrees, a spin rate higher than 6500 rpm and a slight draw shape.

Take a look to see how it's done...

For a deeper understanding of this shot and all wedge shots around the green you need to go HERE

The Wedge Project and a New Look!

I am very excited to announce the release of The Wedge Project. It has been a long time in the making and I have learned so much more than I ever thought I would when I departed on a simple research project almost four years ago. That idea, to learn more about that low launching, high spin pitch or chip shots that golfers would sometimes hit, has opened my eyes to what I now view as the "missing link" to short game instruction.

wedgeproject

Thank you all so much for your patience as you have waited for me to get this "project" out to you. I am pleased with the product and know that everyone will benefit from the information presented. If you like/enjoy/appreciate what you see could I ask that you please share with your friends how they too might be able to purchase the video - unless of course you don't want them pitching/chipping any better. 

Thank you for your support and readership and I am grateful for anything you could do to help get the word out. Please share your thoughts here and on Twitter using #wedgeproject

)

Also, I hope you enjoy the new look of Andrew Rice Golf. We would love to hear your comments, both positive and constructive. If there is anything wrong or missing please shoot me a note and I'll work to get it taken care of ASAP.

Thanks again for everything - without you this site would not be possible.


Winter Weather Drills

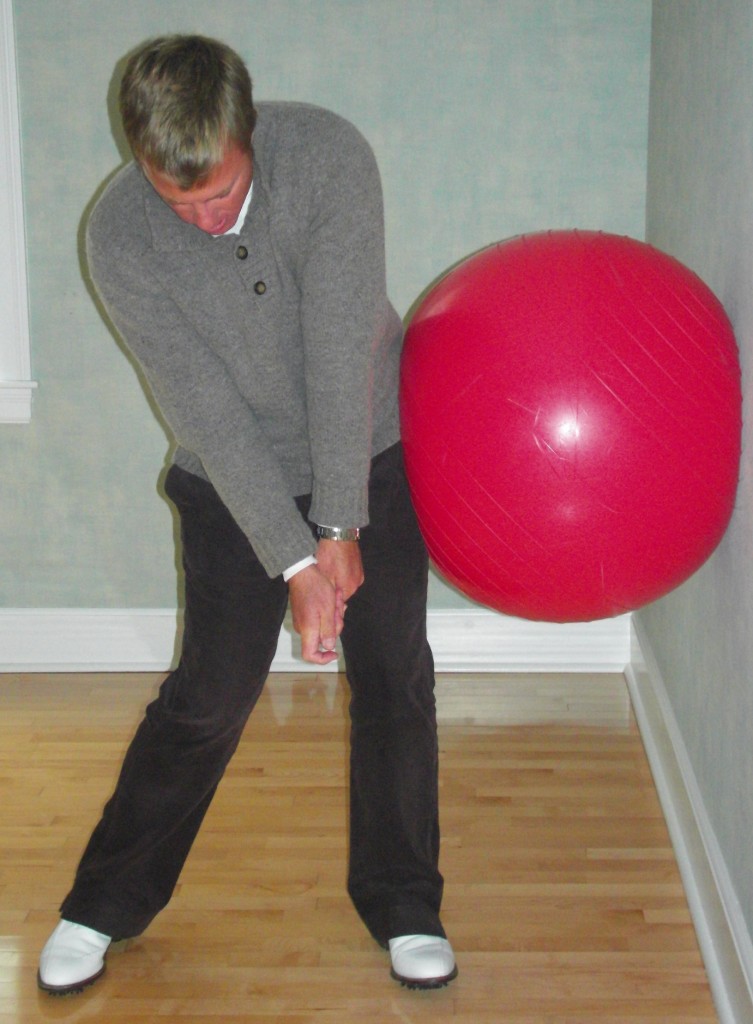
With the entire northern hemisphere seemingly in the grip of the polar ice cap I have come up with two drills that can be performed without a club and indoors.  They should prove to be invaluable to golfers of every caliber. The Ball Compression Drill

The Ball Compression Drill

This is a drill to do at home or in the gym and translates the feeling of impact nicely. Be sure to only drive the hips to compress the physio ball and not the entire body.  Do this drill on a regular basis and you will really start to gain a sense for what the downswing should feel like.

Arms at Impact Drill

This drill conveys the feel for what the hands and arms need to be doing as they approach impact. It can easily be done indoors and is something that every golfer could benefit from.  Be sure to start this drill with some crease in the right elbow and right wrist if you are a right hander.

If you are hunkered down indoors yet still feel the need to work on your game these drills will go a long way towards preparing you for when the season rolls around. Please view all the above drills and others on my Youtube channel. Just enter andrewricegolf to see them all.

Thank You and Merry Christmas!

Thank you so much for your support and readership in 2013 and I would like to wish you and your family a very Merry Christmas! Without you my passion would be pointless....

Holiday Gift Certificate Specials:

  • Series of Five Lessons (Pay for 5 and get 1 FREE)
  • Series of Ten Lessons (Pay for 10 and get 2 FREE)
  • Members receive $10 off a One Hour Lesson
  • Non-members receive $20 off a One Hour Lesson
  • Great Offers for Wedge and TrackMan Group Sessions starting at $75 in the New Year too!

The member lesson rate is $120 per hour and the non-member lesson rate is $175 per hour. Payments can be made via PayPal.

Please contact arice(at)berkeleyhallclub.com for further details.

I am also very excited to release what is the culmination of almost three years of research and testing . The Wedge Project is an in depth video that explains what is important to being able to hit consistently crisp, zippy wedge shots. Please trust me on this one - I know I have been promising this video for some time now - it will be worth the wait and every penny you spend on it!

Here is a little of what you can expect...

I anticipate the cost to be in the $14 range and it will be available via download from my website. The video will be somewhere between 30 and 45 minutes in length and will include numerous drills and a clear explanation of what really is important when you have a wedge in your hand.

Please be patient with the release of this video as I would much the final product be a little late and great than early and mediocre. I know you're going to love it, simply because what I share WORKS!

I am looking forward to an exciting 2014 as I spend my first full year at Berkeley Hall in a long time. I hope we can all get to spend some time together on the lesson tee or online in the upcoming year.  Thank you for everything!

#wedgeproject

My Day with Chuck Cook and Stan Utley

Utley, Cook and Rice I was recently invited to present at the Illinois PGA Teaching and Coaching Summit alongside Stan Utley and Chuck Cook. Besides it being a tremendous privilege for me the day was both educational and entertaining. I thought it would be beneficial to relay a few of the nuggets they shared during the course of the day.

Chuck Cook

The theme of Chuck's presentation revolved around what he teaches and why. His themes were:

  • a flat or bowed lead wrist
  • a straight plane line (similar to the "one-plane" look, but with the elbows staying in front of the chest like Jason Dufner)
  • lag is a major power source - use it, don't lose it!

A few important ideas he shared with the group were:

  • There has never been a swing method that has lasted
  • If the face is shut you need to outrun it with something
  • The weight moves where the hips are pointing
  • I don't like a lot of hip drive
  • Both feet should be flat on the ground at impact with irons
  • To make any golfer better, take their weakest element and turn it into a strength
  • Let juniors smash the ball with all they've got until they stop growing - then work on technique

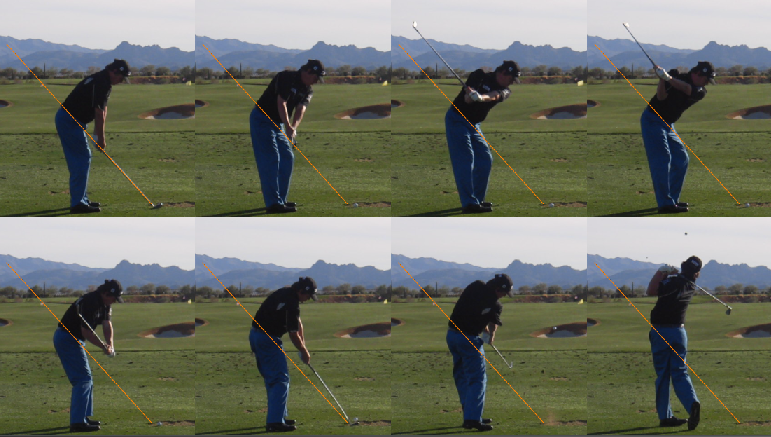
Here is a swing by Jason Dufner, one of Chuck premier students - this swing seems to epitomize so much of what Chuck stressed as he spoke about the swing...

Jason Dufner

Stan Utley

As you may well know Stan's teaching focuses primarily on the shortgame and putting. Here are some of the important principles Stan shared in his presentation:

  • Putt with dead strength - he described "dead strength" as being similar to dropping your limp arm against your side
  • Let the putter drop and crash into the ball - I love saying it that way!
  • An important point in both chipping and putting is to put pressure on the ball
  • He is an advocate of wristy putting with soft, loose elbows
  • Where you strike the ball on the face vertically with the putter is very important
  • Finish the putting stroke with the putter low and the right shoulder high
  • Have the handle travel more slowly so the clubhead can travel faster

I really enjoyed so much of what Stan had to say as he seemed to be a proponent of so much of what I preach in both the shortgame and putting.

It was great to listen to these exemplary teachers, but the highlight of my day was being able to present my teaching approach to the Illinois PGA membership. Thanks to Nick Papadakes and all the staff at Olympia Fields CC for a very cool experience and I look forward to my next opportunity...

Controlling the Clubface

Here's a great drill that will help to create awareness of where the clubface is angled at impact...

Keep in mind that the clubface is PRIMARILY responsible for where the ball launches, while the clubpath is PRIMARILY responsible for the curvature of the shot. If you know the predominant shape of your shots, the key is to launch the ball in the proper direction - this drill will help! Give it a try and please let me know if you've made any progress.

Understanding Shot Shape

Please watch....

I have never taught a predominant slicer that did not always have their clubpath travelling from out to in on a very consistent basis. I have never taught a predominant hooker that did not always have their clubpath travelling from in to out on a very consistent basis. In order to upgrade these golfers' ball flight we needed to improve their path first and then work to adjust the face to point somewhere between the path and the target line.

Here is an example of a lesson I might give to a golfer who predominantly fades/slices the golf ball:

I hope these two clips help you to better understand what it is you need to do to improve your ball flight and have more fun out on the golf course.