Try the BOX Drill

If you struggle with heel strikes or worse yet the shanks, then this drill is for you. Swing too far from in to out? Too far from out to in? This drill is for you. It is, quite simply, the kind of drill that so many golfers should utilize as their staple practice drill whether they are warming up or just getting some solid practice in.

A few points to note:

  • You can use a club box, a 2x4 (be careful!) or a partially empty plastic water bottle laying on it’s side

  • Align the box at the target

  • Tee the ball up approximately 2” inside the box

  • Start off with shorter irons and work your way up to the bigger clubs

This is a super drill for everybody! Keep the box in your trunk or locker and use it fior a few shots every time you’re warming up or practicing as it will always serve to give you a clear indication of a fairly neutral strike and club path - bot good things.

Thanks so much for your readership and support in 2021. It has once again been a fairly challenging year, but I cannot be more grateful for my family, friends, students and the career path that I have chosen. Here’s to making 2022 your best year in golf yet!

Cheers.

Tilts & Turns!

If you want the ball to get moving you’ve got to get your body moving and this very simple exercise is a little gem that we all should be practicing on a regular basis. I find it to be an excellent reminder of the tilts, turns and stretches we need to incorporate into the golf swing. Watch…

A few checkpoint to keep in mind when doing the exercise:

  • Hold a club across your shoulders by crossing your arms across your chest

  • Position the handle of the club on the lead/target side of your body

  • In the backswing get the handle to point at the ball or where the ball would be

  • Allow the trail side to extend and the trail knee to straighten

  • The lead side should feel low and the trail side high as it stretches and extends

  • Repeat these feels as the swing moves into the downswing and follow through

  • In the post impact portion of the swing the trail side lowers/shortens while the lead side will elevate and extend

This exercise does such a good job at reminding us what a real swing should FEEL like. While the positions of the drill are a little extreme they carry through nicely into an actual shot. I know this simple, take home exercise will go a long way towards helping a large percentage of the golfers that show up on my lesson tee. Give it a try!

Try This for Better Compression

Too many golfers that I teach are struggling to compress the golf ball! There is a distinct lack of energy being transferred from the clubhead to the ball. Getting the club face in position in the early part of the downswing is tremendously helpful in increasing compression and the sizzle factor off the face. Here’s how…

When trying this drill look for the following:

  • Don’t try to hit balls with this - it’s all about getting the correct feel

  • Hold the club at the bottom of the grip in your lead hand with the clubhead well off the ground

  • As you get to the top you should see the handle out in front of your forearm

Doing this drill correctly will ensure that you’re getting both the club face and the clubhead in a good spot to initiate the downswing without having to work hard to shallow the club or lay the shaft down.

This should be your view when you have the club at the top of the backswing. Give it a try and see if you can incorporate the feel into your next practice or warm-up session.

Thanks for reading/watching along and it is my wish that somehow I can manage to share something that helps you experience more joy while you’re out on the links.

Cheers!

An Important Chip Tip!

As golfers we typically don’t have very good awareness regarding how we are moving. We know what we should be doing, but we have a hard time executing the intended move. My explanation in the following video addresses one such situation. Watch…

A few notes:

  • I know this might sound contrary to what you’ve been trying to do for a long time, but consciously try to move forward and up through the strike

  • Feel that the trail shoulder makes a concerted “push” towards the target throughout the downswing

  • Something that has worked for my students and I has been to push off the trail foot on the way down into impact

  • Don’t ever try to stay down or back

Watch what two of the best in the business do on the way into impact. Mr. Jose Maria Olazabal and Mr. Brett Rumford

I hope you find some of these ideas to be helpful to your game and that ultimately you are able to experience more joy out on the golf course. Thanks for reading and watching!

Are you interested in golf travel? If so we are going to South Africa this coming January 2022. Here’s an incredible brochure on our trip and what we have planned - SOUTH AFRICA 2022

3 Big Driver Keys

foset1.jpg

Set Up:

  • Tee the ball high if you’re looking for max distance, lower if you’re looking for more accuracy.

  • Tilt your spine away from the target. Set up to hit up!

  • Drop the trail foot back inside the target line to aid in making a bigger turn.

fotop1.jpg

At the Top:

  • Make as big a pivot as your body will allow, trying to feel the trail leg straightening and the trail hip elevating.

  • Get the handle as far back as you can into the backswing. It should travel both up and in.

  • The longer the backswing the greater the energy you can pump into the system and the more time you have to organize on the way down.

foimp1.jpg

At Impact:

  • Drive the weight down and towards the target in the early downswing.

  • As you approach impact push hard on the lead foot. This will raise the handle, elevate the angle of attack and increase the power.

  • Feel your hips opening up nicely to the target.

I know that these simple keys will help to improve both the distance and the accuracy that you have been experiencing off the tee! Give them a go and if you have any questions, please just reach out.

Cheers and thanks for reading !

Straight Shooting Concepts

We can all do perform better when we have good information. A clear understanding and vision of how things really work. In this video I will try to share important keys to help you start to hit the ball with more accuracy via a few simple concepts. Watch…

A few notes to consider:

  • We hit straight shots by swinging in circles/arcs

  • The clubhead does not need to travel ‘down the line’ after impact

  • There is no need for every golfer (RH) to work towards swinging to right field. Chronic slicers might need to do this for a while, but not forever!

  • Divots will typically show us far less than we have been led to believe

  • Once you know how to hit a hook, it’s time to neutralize

  • Improved mechanics will almost always reduce the golfer’s reliance on timing and athleticism

IMG_4687.jpg

In the above image, due to the slower than necessary shutter speed, you can clearly see how Sergio’s clubhead has started to track back inside the flight of the golf ball. That’s a common trait for all of the best ball strikers in the game!

Thanks for watching/reading and I hope this information gets you thinking and, ultimately, playing some better golf.

If you’d like to attend one of my Three Day Golf Schools to get some personalized, hands-on attention please check out this LINK snd shout with any questions you might have.

Precision Pitching

We would all like to get the ball up and down from inside 100 yards, but the reality is that for the majority of us we are more likely to take four to get down than we are to take two. Most of the top players and coaches I’ve discussed pitching with over the years have shared that they utilize some form of a template to encourage feel and familiarity with all the different shots we encounter from inside 100 yards. Here are a few ideas that I’ve found to work best for the everyday golfer. Watch….

I have three primary wedges that I might use for playing pitch type shots. There’s a strong chance that you have a slightly different wedge make up to the one I have. The idea here is to limit the two most lofted clubs to a comfortable distance less than a full swing. Here are my thoughts with each of my clubs:

58º

  • A full swing will carry 85 yards with this club but I never will attempt to hit it that far

  • I will use this club outside of the chipping zone all the way up to 60 yards and no further

  • A sensible “core distance” to practice with this club is 50 yards

  • Ball position is always centered with a narrow stance and the weight favoring the front foot 60/40

54º

  • A full swing will carry 100 yards with this club but I will not try to hit it that far

  • This club covers the 60-90 yard range which means a sensible “core distance” will be 75 yards

  • I will also focus on the feel required to hit this club both 60 and 90 yards

  • Set up and approach is the same with all pitch type shots

50º

  • This club covers the 90-110 yard range

  • A sensible “core distance” to practice with this club is 100 yards

  • An important feel with this club is to practice what 90 yard shots feel like

  • Keep in mind that a full swing for this club is 110 yards and I will use this club for that distance by reverting from a pitching set up to my full swing set up

This will take a little thought and some planning, but doesn’t anything that’s worthwhile doing? Create your zones, commit to the plan, anticipate some early stage discomfort as you acquire the necessary skills and build appropriate practice habits over time.

Give it a try and I know you’ll reach out fairly soon to say how much better you’re able to control your golf ball from inside 100 yards. All the best.

Thanks for reading!

Two Minutes to Better Golf

You have got to try this simple, yet highly effective, exercise! Whilst it’s not as easy as it might appear it can be done fairly quickly and at home. This valuable little nugget was shared by my friend and Golf Fanatics expert contributor, Mike Carroll. It will help with mobility, strength and mechanics. Watch….

  1. Mobility

    As you work through each swing strive to go back a touch further than you did on the previous swing. I’ve done this for a week now and can feel the difference already.

  2. Strength

    As much as we might not be willing to admit it, strength makes a substantial difference in the distance that we hit the golf ball. If you start doing this with a light weight try to move up in weight as the weeks progress. I’m currently using an 8 pound medicine ball.

  3. Mechanics

    This is something that Mike pointed out to me. When you have to recruit every resource available to you to move this weighted object back as far as possible it’s interesting how well you move. The lead heel elevates, the hips help out, the chest turns a ton and the shoulders and arms do a nice job too. Not much I would change really!

I know you’d like to get better. So would I. The fact is that the only way it can possibly happen is if we start to make improvements…and they don’t come easily. Start today and don’t give in! It ultimately is always up to you. Get out of your comfort zone and you’ll be amazed.

ssnead.jpg

Make a BIGGER Backswing!

I struggle with this one too! Making a bigger backswing. So many ‘seasoned’ golfers that I have the privilege of working with struggle to make a big enough backswing and it really hinders their ability to hit the ball both far enough and well enough. Watch…

A few keys to help you to start getting more out of your body and your backswing:

  • Work towards turning your hips as far back as you can

  • Free up your feet by allowing the lead heel to lift off the ground

  • Allow the trail leg to straighten significantly

  • Any amount of improvement in flexibility will help in this department

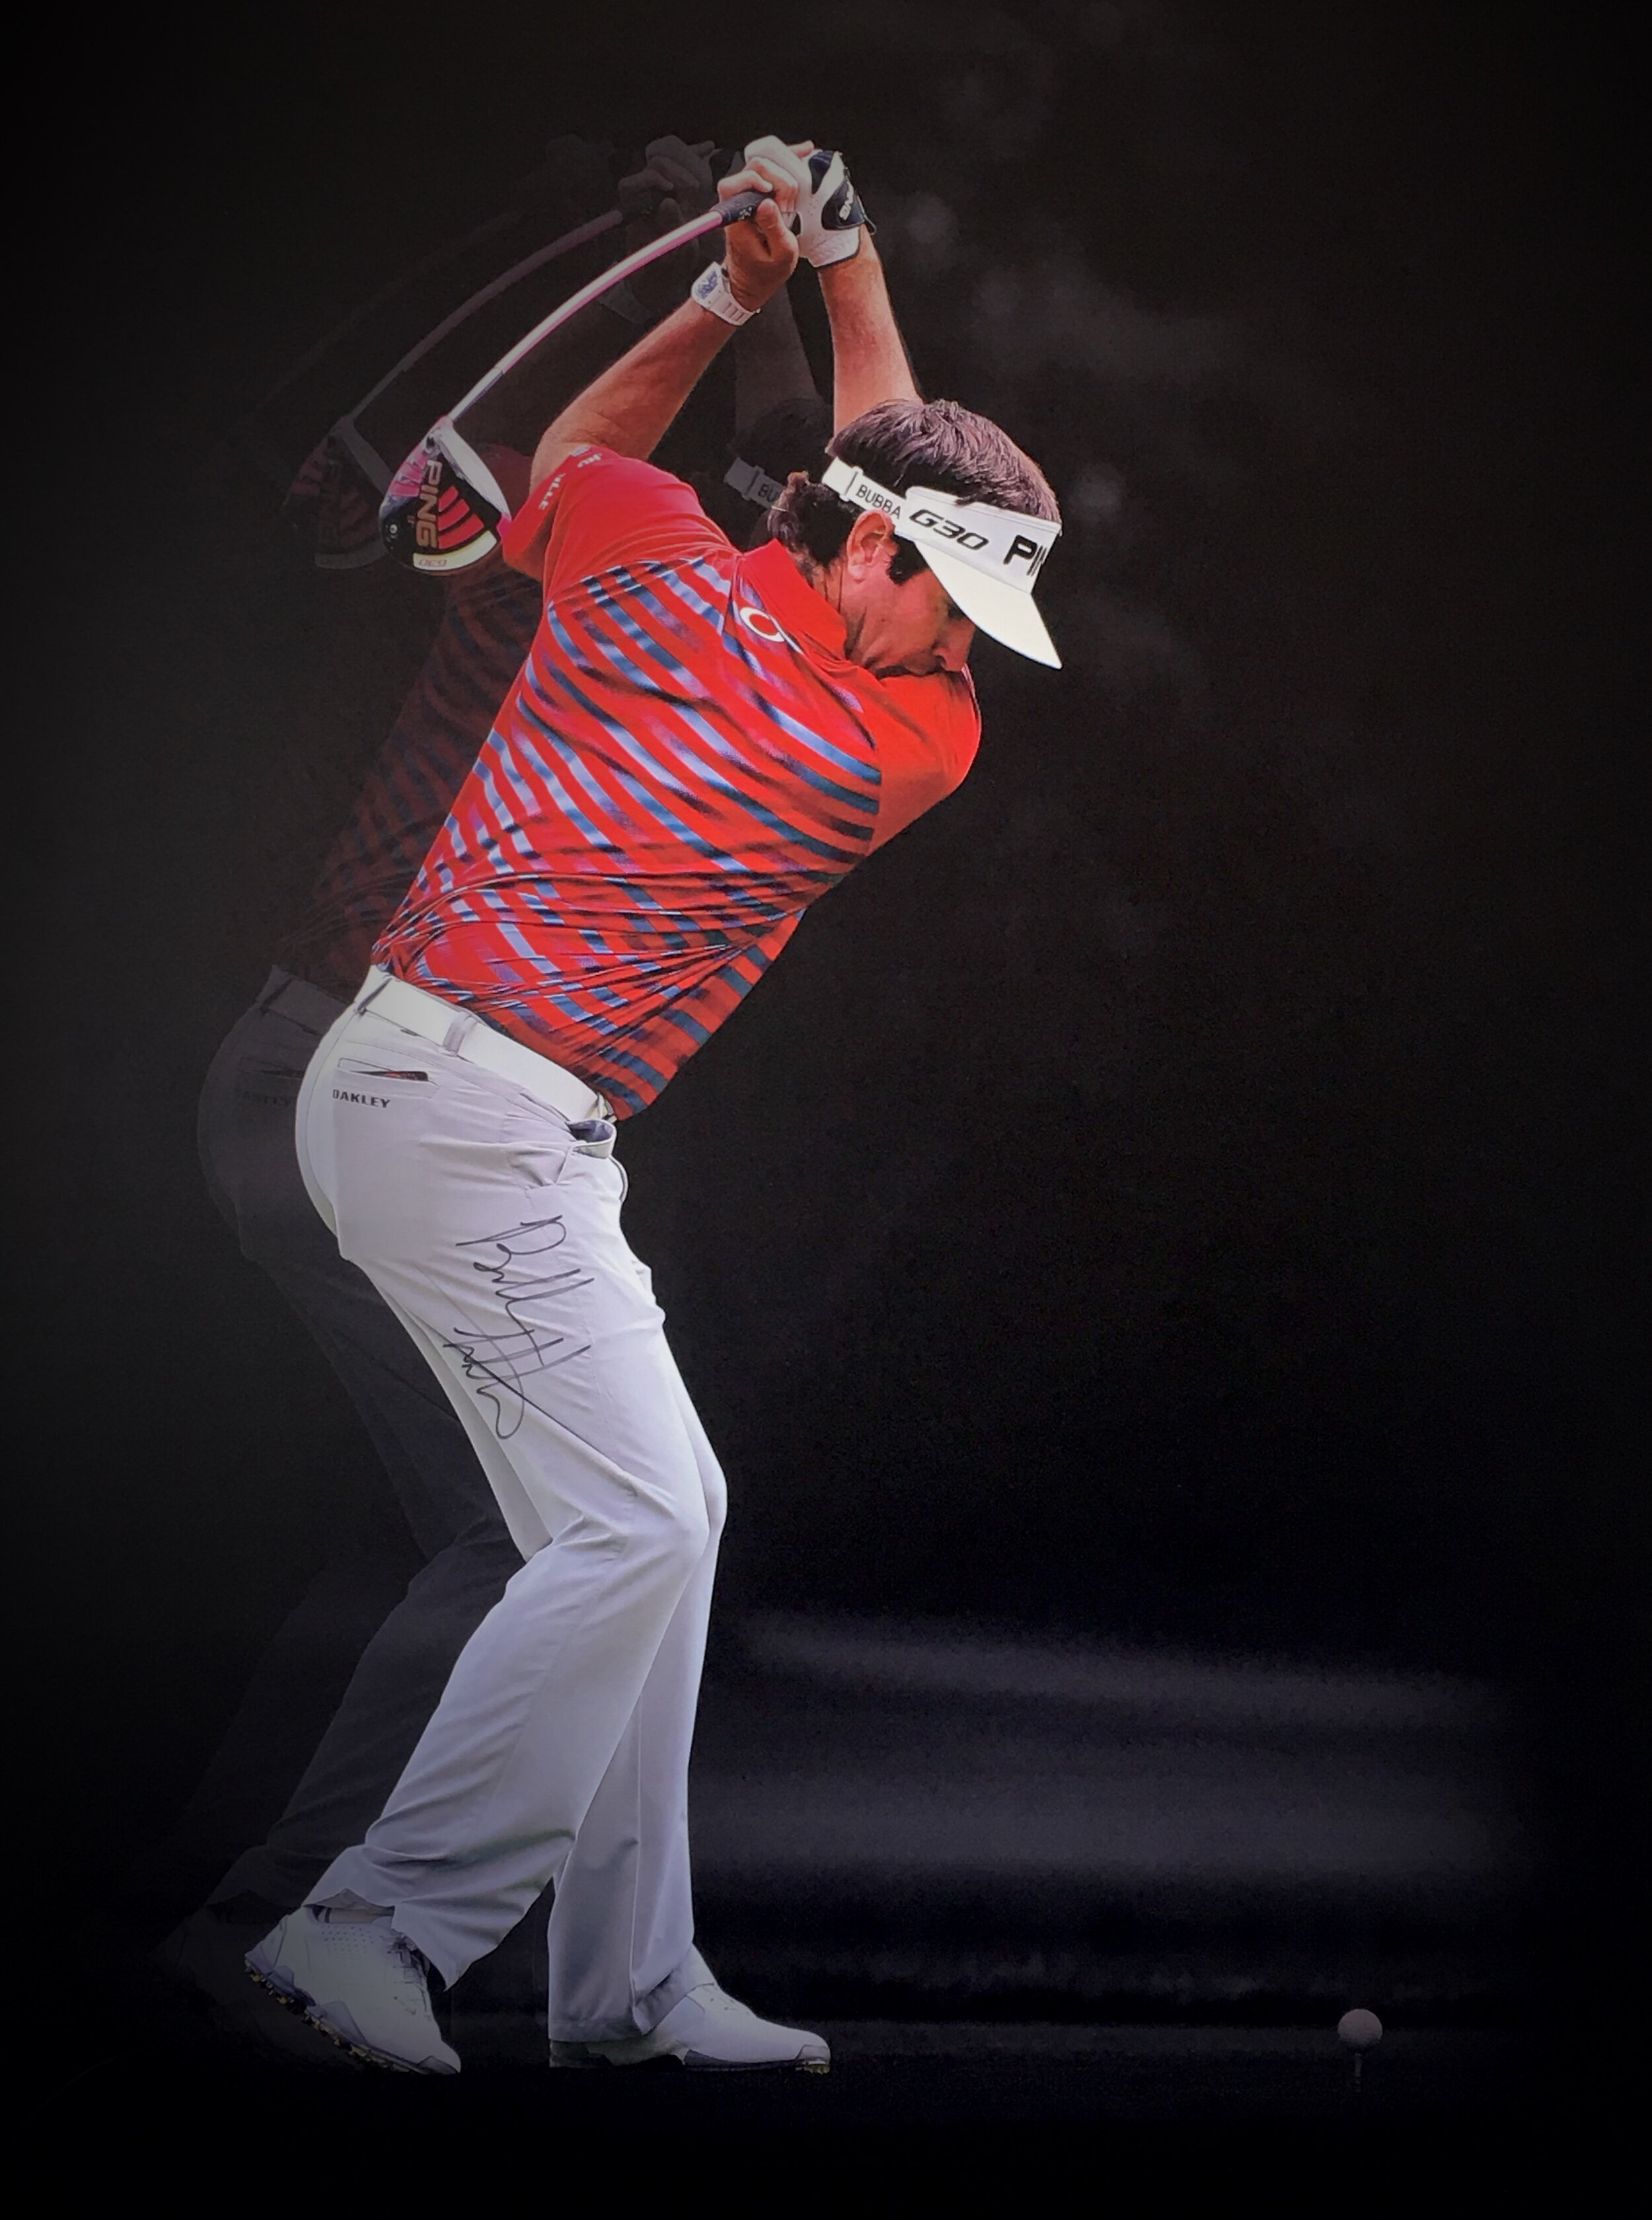
BubbaTop.JPG

Now, not many of us will be able to get to where Bubba is in the above image, but let it serve as inspiration for all of us. That bigger turn, when done properly, will allow for an increase in clubhead speed and more time to organize the club face as it approach impact.

Take your time, but start the journey today. Allocate one month to this endeavor by committing to make 20 BIG practice swings each day. I think you’ll be amazed!

Get the Face in Place!

The ability to control both the face angle and loft at impact is paramount to playing better golf! This element in the golf swing really plays a major role in my teaching philosophy. Here’s a simple, yet illustrative, video that shows what can go wrong and how it needs to work…

So much of what we do in our golf swings is dictated by the face angle in the early part of the downswing. An open face means a stalled pivot and handle to go along with too much loft and an inconsistent strike. On the other hand an overly closed face will encourage too much lateral drive in the downswing and cause the hands to ultimately be too far forward and de-loft the face too much. This image illustrates the two extremes…

7DC28B2C-CA35-46EA-9EF7-0FE3B15876E1.jpg

If you can make, even subtle, upgrades during this all important part of the golf swing you’re going to see a marked improvement in both your ball-striking and flight. Give it a go!

handclubpath.jpg

Improve One Thing

My experience as a coach has been that when a golfer sets out to improve one part of their game and they fully commit to making the upgrade over time, they almost always reach their objective. Watch…

This is the perfect opportunity to sit down and evaluate what went well for you as a golfer in 2020 and where you’d like to make gains. Write it down, come up with a plan and then commit fully to the process.

My goal this year is to increase my ability to move as an athlete. That incorporates flexibility, strength and agility. My goal is to be able to get to 170mph ball speed while playing a round of golf and I’m currently at 166.8mph when on the range. There’s a long road to go yet, but I have a plan that involves both the physical elements and the practical side.

What are you going to achieve on the golf course in 2021?

Let’s do it together!

AR6 copy.jpg

Top Tier Tempo!

In this article I’m going to share three helpful exercises to help you smooth out the tempo of your golf swing. Let’s get the oil of the golf swing flowing through your engine! Watch….

I work with golfers on an almost everyday basis to help them complete the backswing and ultimately improve the rhythm and flow in their golf swings. These three drills will help:

Three Ball Drill

  • Tee up three golf balls and do this drill with a 9 or 8 iron

  • Keep in mind that the rhythm does not have to be slow here

  • Make full, completed backswings where you flow from one strike straight into the next

Towel/Rope Drill

  • Use a bath towel or heavier, marine gauge rope to do this drill

  • This will encourage patience as the downswing cannot start before the towel completes the backswing

  • Feel how the energy flows down into the end of the towel (clubhead)

towel.jpg

Hideki Pause

  • In this drill you’ll feel an almost invisible pause at the top of your backswing

  • Try to pause for as long as you comfortably can

  • This does a tremendous job to give any golfer the sense of a full and completed backswing

Now, I know that mechanics play a big role in any golf game, but sometimes all we need is a better feel and sense of rhythm in our golf swings to get things headed in the appropriate direction. Give a few of these drills a try and see what it can do for your game. Especially when you get a little anxious and tight out there!

Thanks for your readership and support throughout 2020! I know we have all learned so much together this year and I look forward to learning and sharing together in 2021.

Cheers!

Stop the Scoop

Are you tired of putting everything you have into your game, only to see the ball literally limp off the club face after each swing? There’s just no return on the energy you’re putting in. Today I’m going to show you how to get the sizzle back into your ball striking. Watch this video first…

I often ask my students which club imparts the most energy into the ball relative to club speed. The answer? Putter. Why? It has the least loft at impact and delivers the least oblique strike to the ball. Learn to reduce the loft coming into impact in order to start compressing the ball off the club face.

  1. Get the club face in place early in the downswing. This is done by bowing/flexing the lead wrist which in turn will de-loft and strengthen the club face by the time impact occurs.

  2. Try the Preset Club Face Drill. Using a 7 iron, take the club back so that the shaft is parallel to the ground making sure the lead wrist and leading edge are tilted down towards the ground slightly. Wind the arms back 1 foot and rotate through, working to maintain the face and wrist angles. The ball flight should be low and penetrating with a slight draw.

  3. Make sure that the low point of the swing arc is forward of where impact occurs. This can be rehearsed by making two practice swings between each shot you hit on the range where the sole of the club bottoms out well in front of where it was resting on the ground. The handle and weight must be forward at impact in order for this to occur.

compression.jpg

If you’re a scooper you owe it to yourself to give these ideas a try. My 30 years of teaching golf say that they truly do work and with a little patience and persistence you’ll significantly improve the quality of your ball striking.

Remember - there is no magic, only hard work and a good solid plan. Get to it!

A Strict No Tipping Policy!

We’ve all been there - a constant battle between fats and thins, blocks and sweeping hooks! This malady is something I experience all too often on my lesson tee and I have an idea that I know will help many of you. Once you work your way through this article your approach to ball striking, your concept of how it should work, will never be the same again. Take a look…

I have come to believe that the primary culprit in tipping the upper body back is the quest to work the clubhead back to the inside or shallow the club on the downswing. I’ve written that “It’s All About Impact”, but you can only arrive at an appropriate impact when certain elements are in place going back and on the way down. The better the clubhead is positioned in the early downswing the less likely golfers are to tip their shoulders and spine away from the target too early.

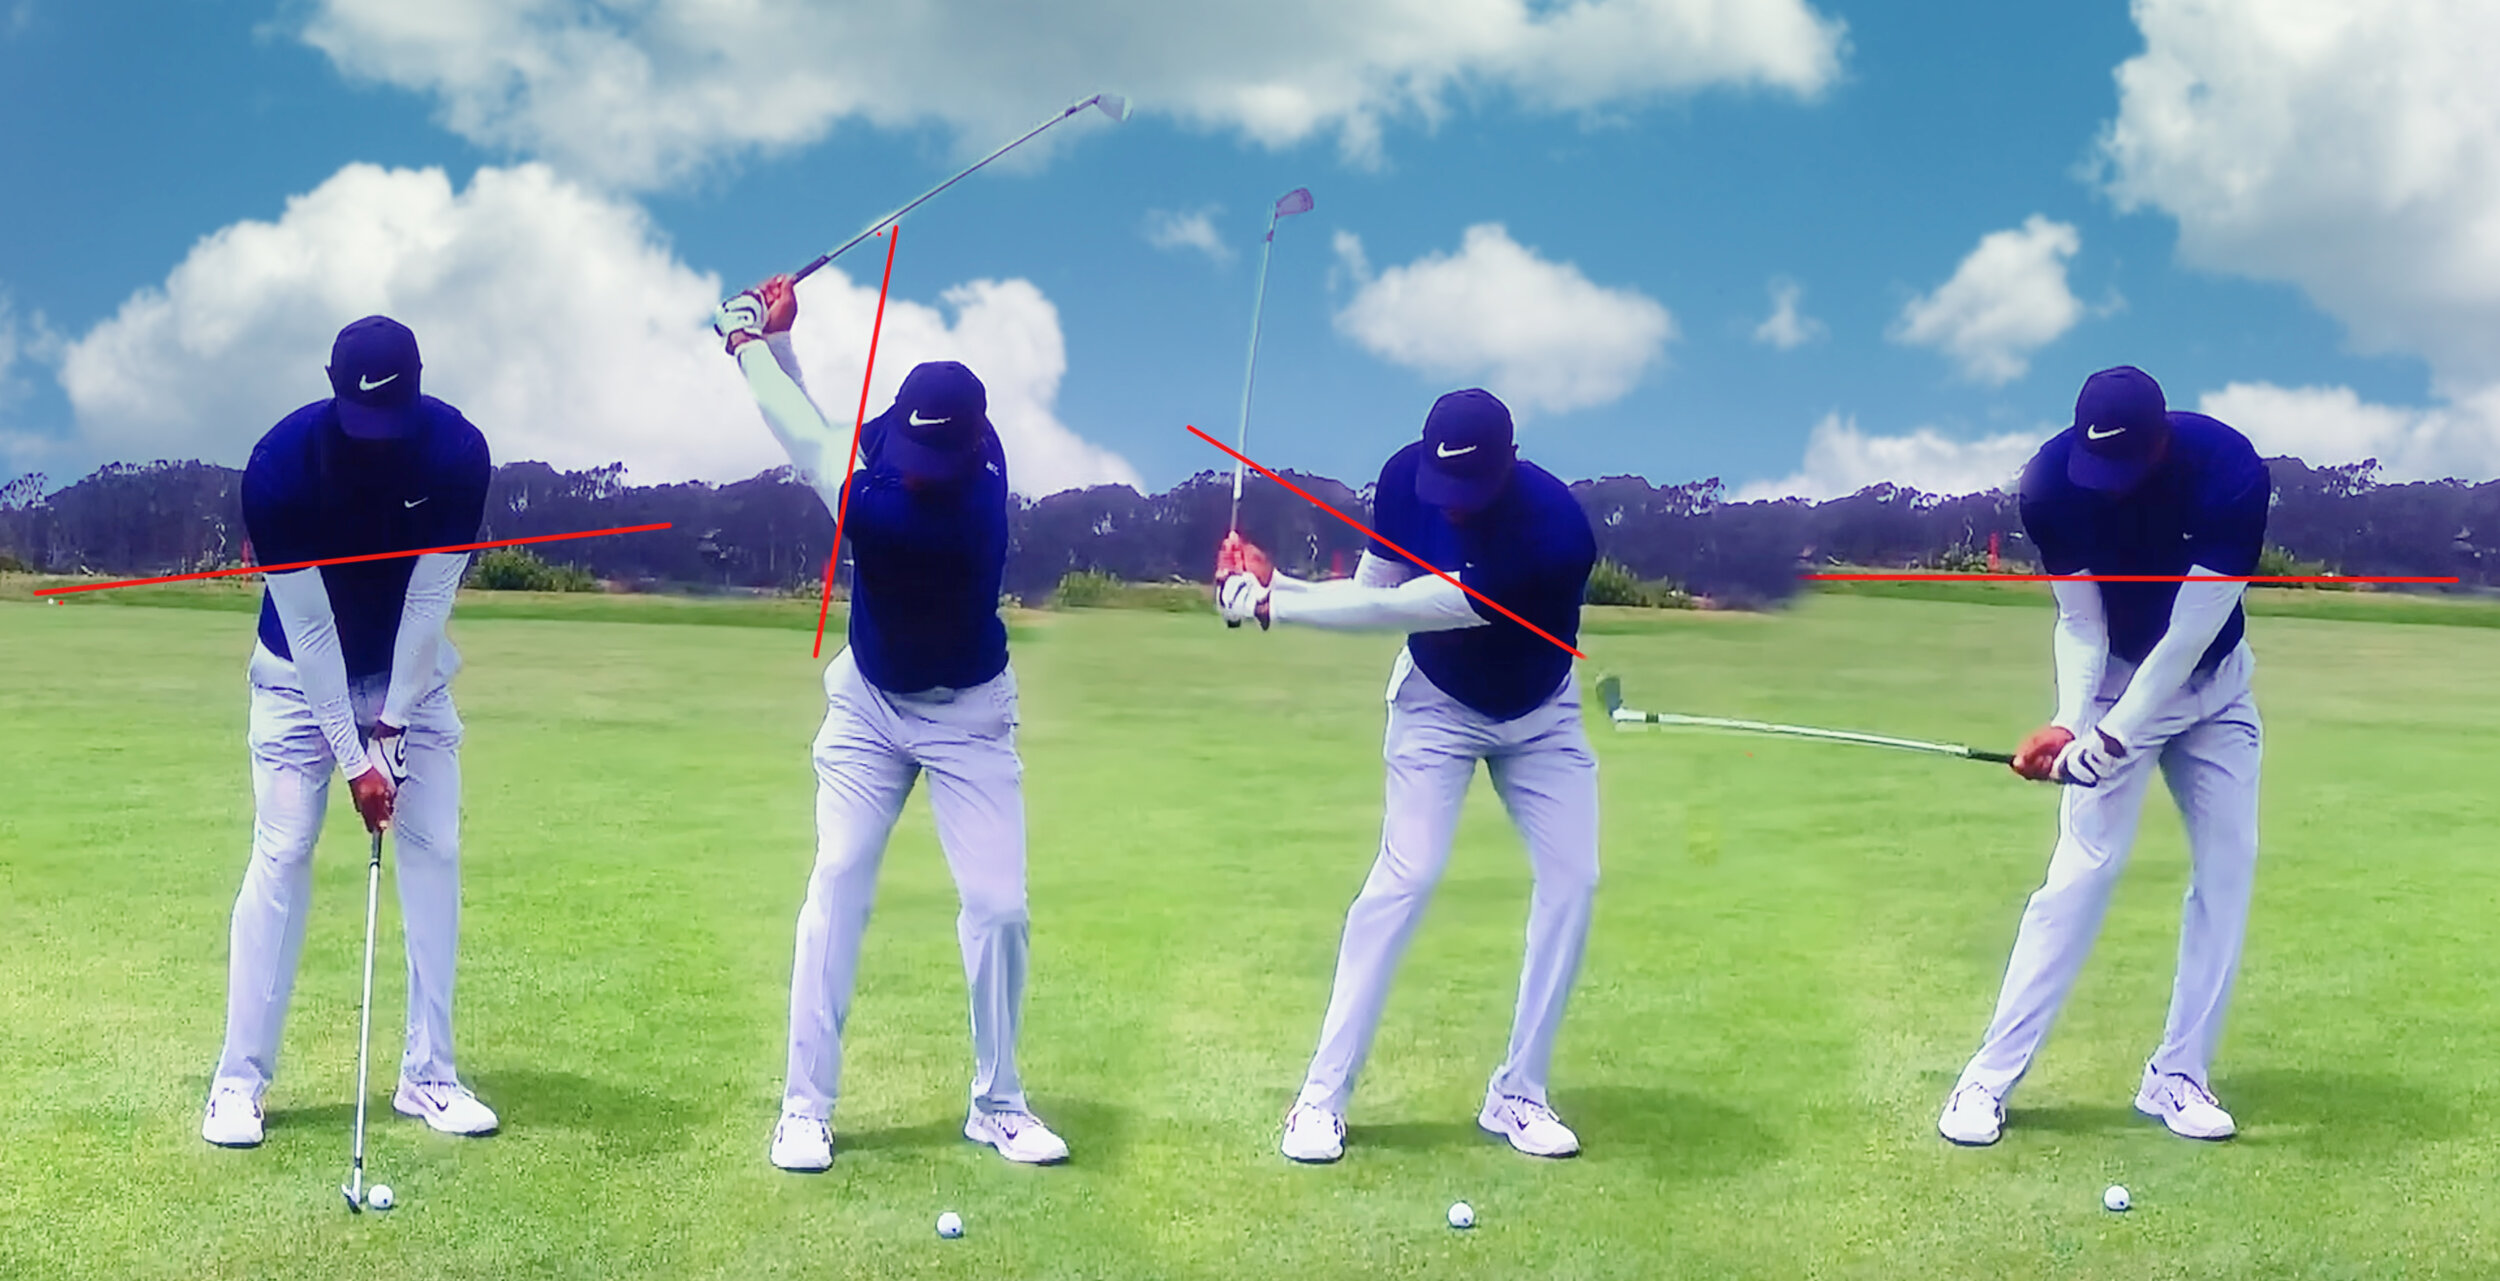
Here’s a face on shot of Tiger Woods from the PGA Championship in San Francisco. I like this example as the bottom of his sleeves seem to correlate to shoulder tilt in these frames.

Tiger Woods

Tiger Woods

Frame 1: Far too many golfers have significantly more shoulder tilt than this at address. The lead shoulder should always be higher, but only marginally.

Frame 2: It’s amazing that Tiger can turn this well after his back issues. That being said, notice how much higher the trail shoulder is than the lead. He has turned well, but perhaps more importantly, he has pivoted on a fairly steep incline with the shoulders.

Frame 3: The inclined pivot going back has aided his ability to initiate the downswing without a hint of tipping away from the target. The weight is left and the body is rotating appropriately.

Frame 4: A great checkpoint for all golfers - make sure that just before the shaft gets back to parallel to the ground, your shoulders (or sleeves) are pretty close to parallel to the ground as well. From here the low point of the arc is well forward of the ball and the player can rotate freely through impact, aiding with club face control. Better ball striking and accuracy!

Get out to the practice tee and make a few exaggerated practice swings as I demonstrated in the video above. It will, and should, feel strange, but straight away you’ll notice how the low point to the swing is now after impact and you can rotate more freely through the strike. Give it a go and let me know your findings.

Thanks for reading!

A Look into a Lesson

Thank you to all of you who have reached out to let me know how much you’ve gained from the insights I’ve been sharing with my students lately. It truly does make me happy to know how many people can benefit from someone else’s golf lesson. With that in mind, here’s another!

I recently got together with Scott who I started teaching 18 months ago. As a relative beginner when we first met, Scott has really worked hard and made tremendous strides - firing an all time best score of 82 recently. At the onset of our most recent lesson I could see that he had continued to make progress.

In an effort to keep my information simple, accurate and actionable I summarized the talking points for our time together into:

  1. Alignment was too far right which led to misses that finished well right of target

aim.jpg

2. Driver was crashing into the ground which led to pop-ups off the tee

wear.jpg

3. Arm structure was a little soft through impact which didn’t bode well for repeatable, quality strikes

arms.jpg

I’ve always found that too much information can often overwhelm a golfer and as a result I strive to keep it as simple as I can. That doesn’t necessarily mean it’s going to be simple - just as simple as possible while making sound upgrades.

I hope this look behind the curtain to see how I run my lessons somehow influences the way you look at your golf progress moving forward. My advice would be to itemize the important stuff and set a time frame to help you stay focused solely on those items. And of course - work hard!

A Lesson to Learn From...

I recently gave an old friend a lesson. Having not taught him for a few years I had an inkling as to what to expect, but things came together so well I thought the information might be beneficial to more than just one student.

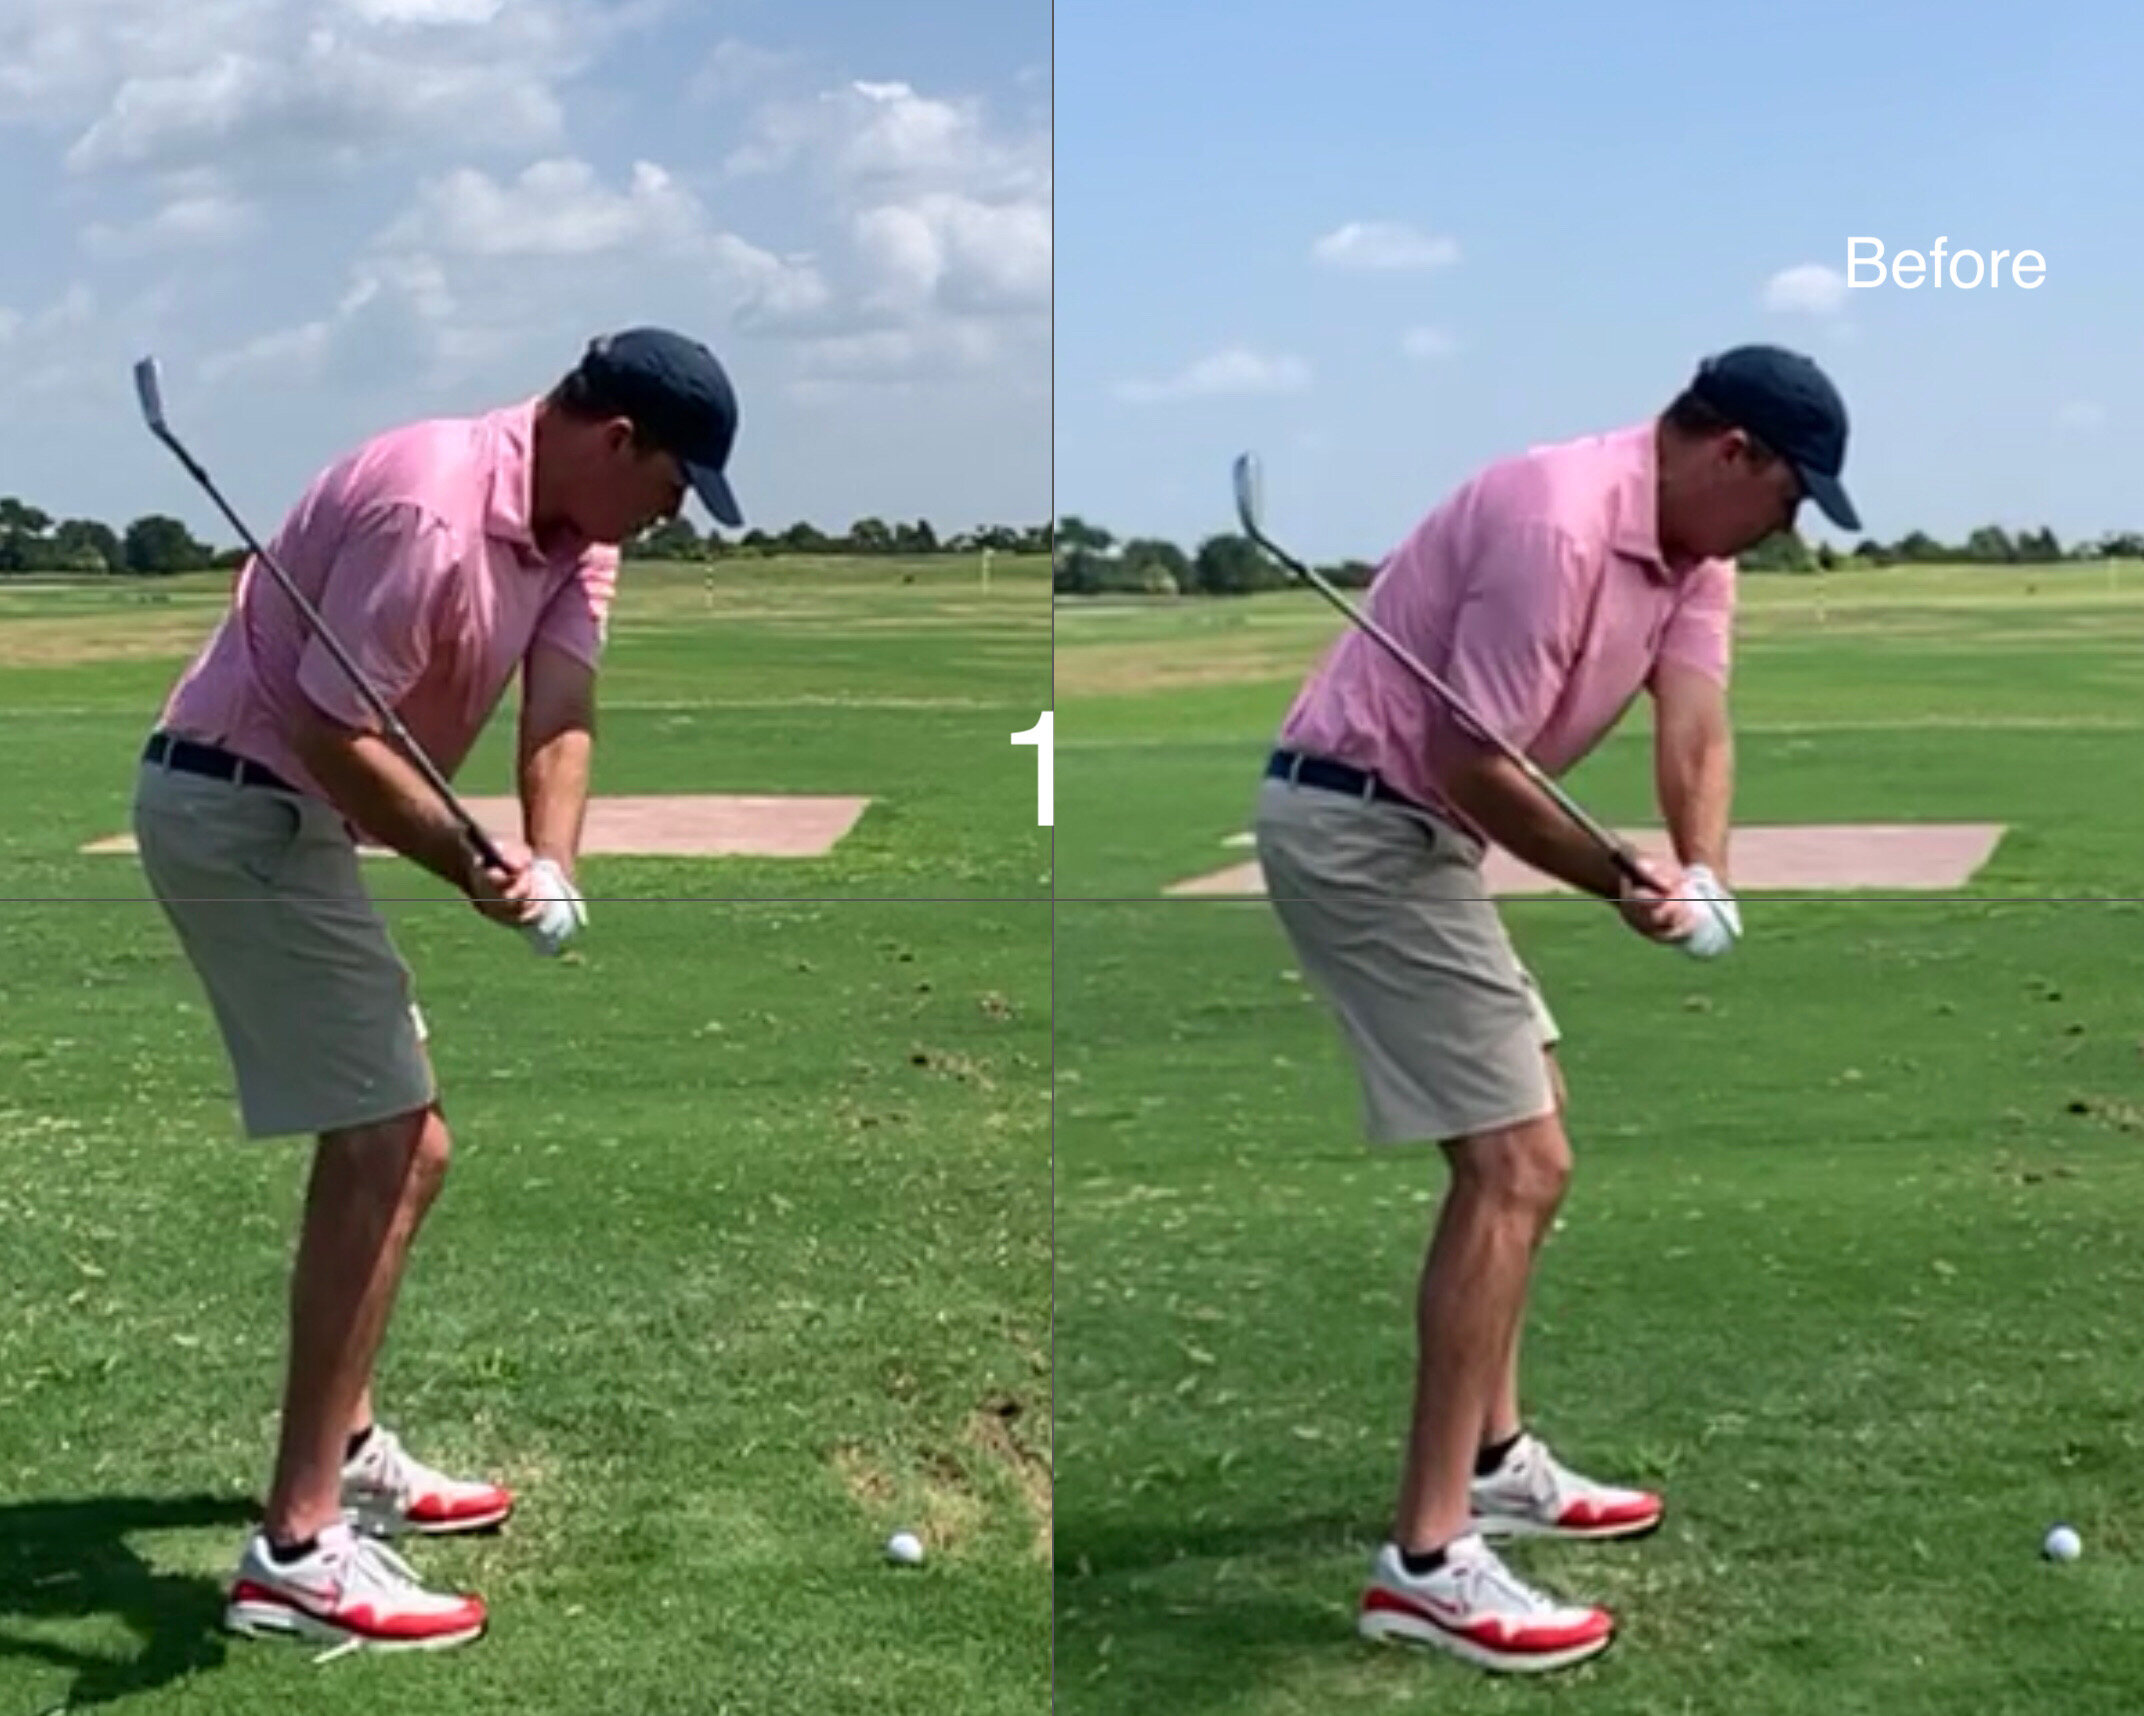
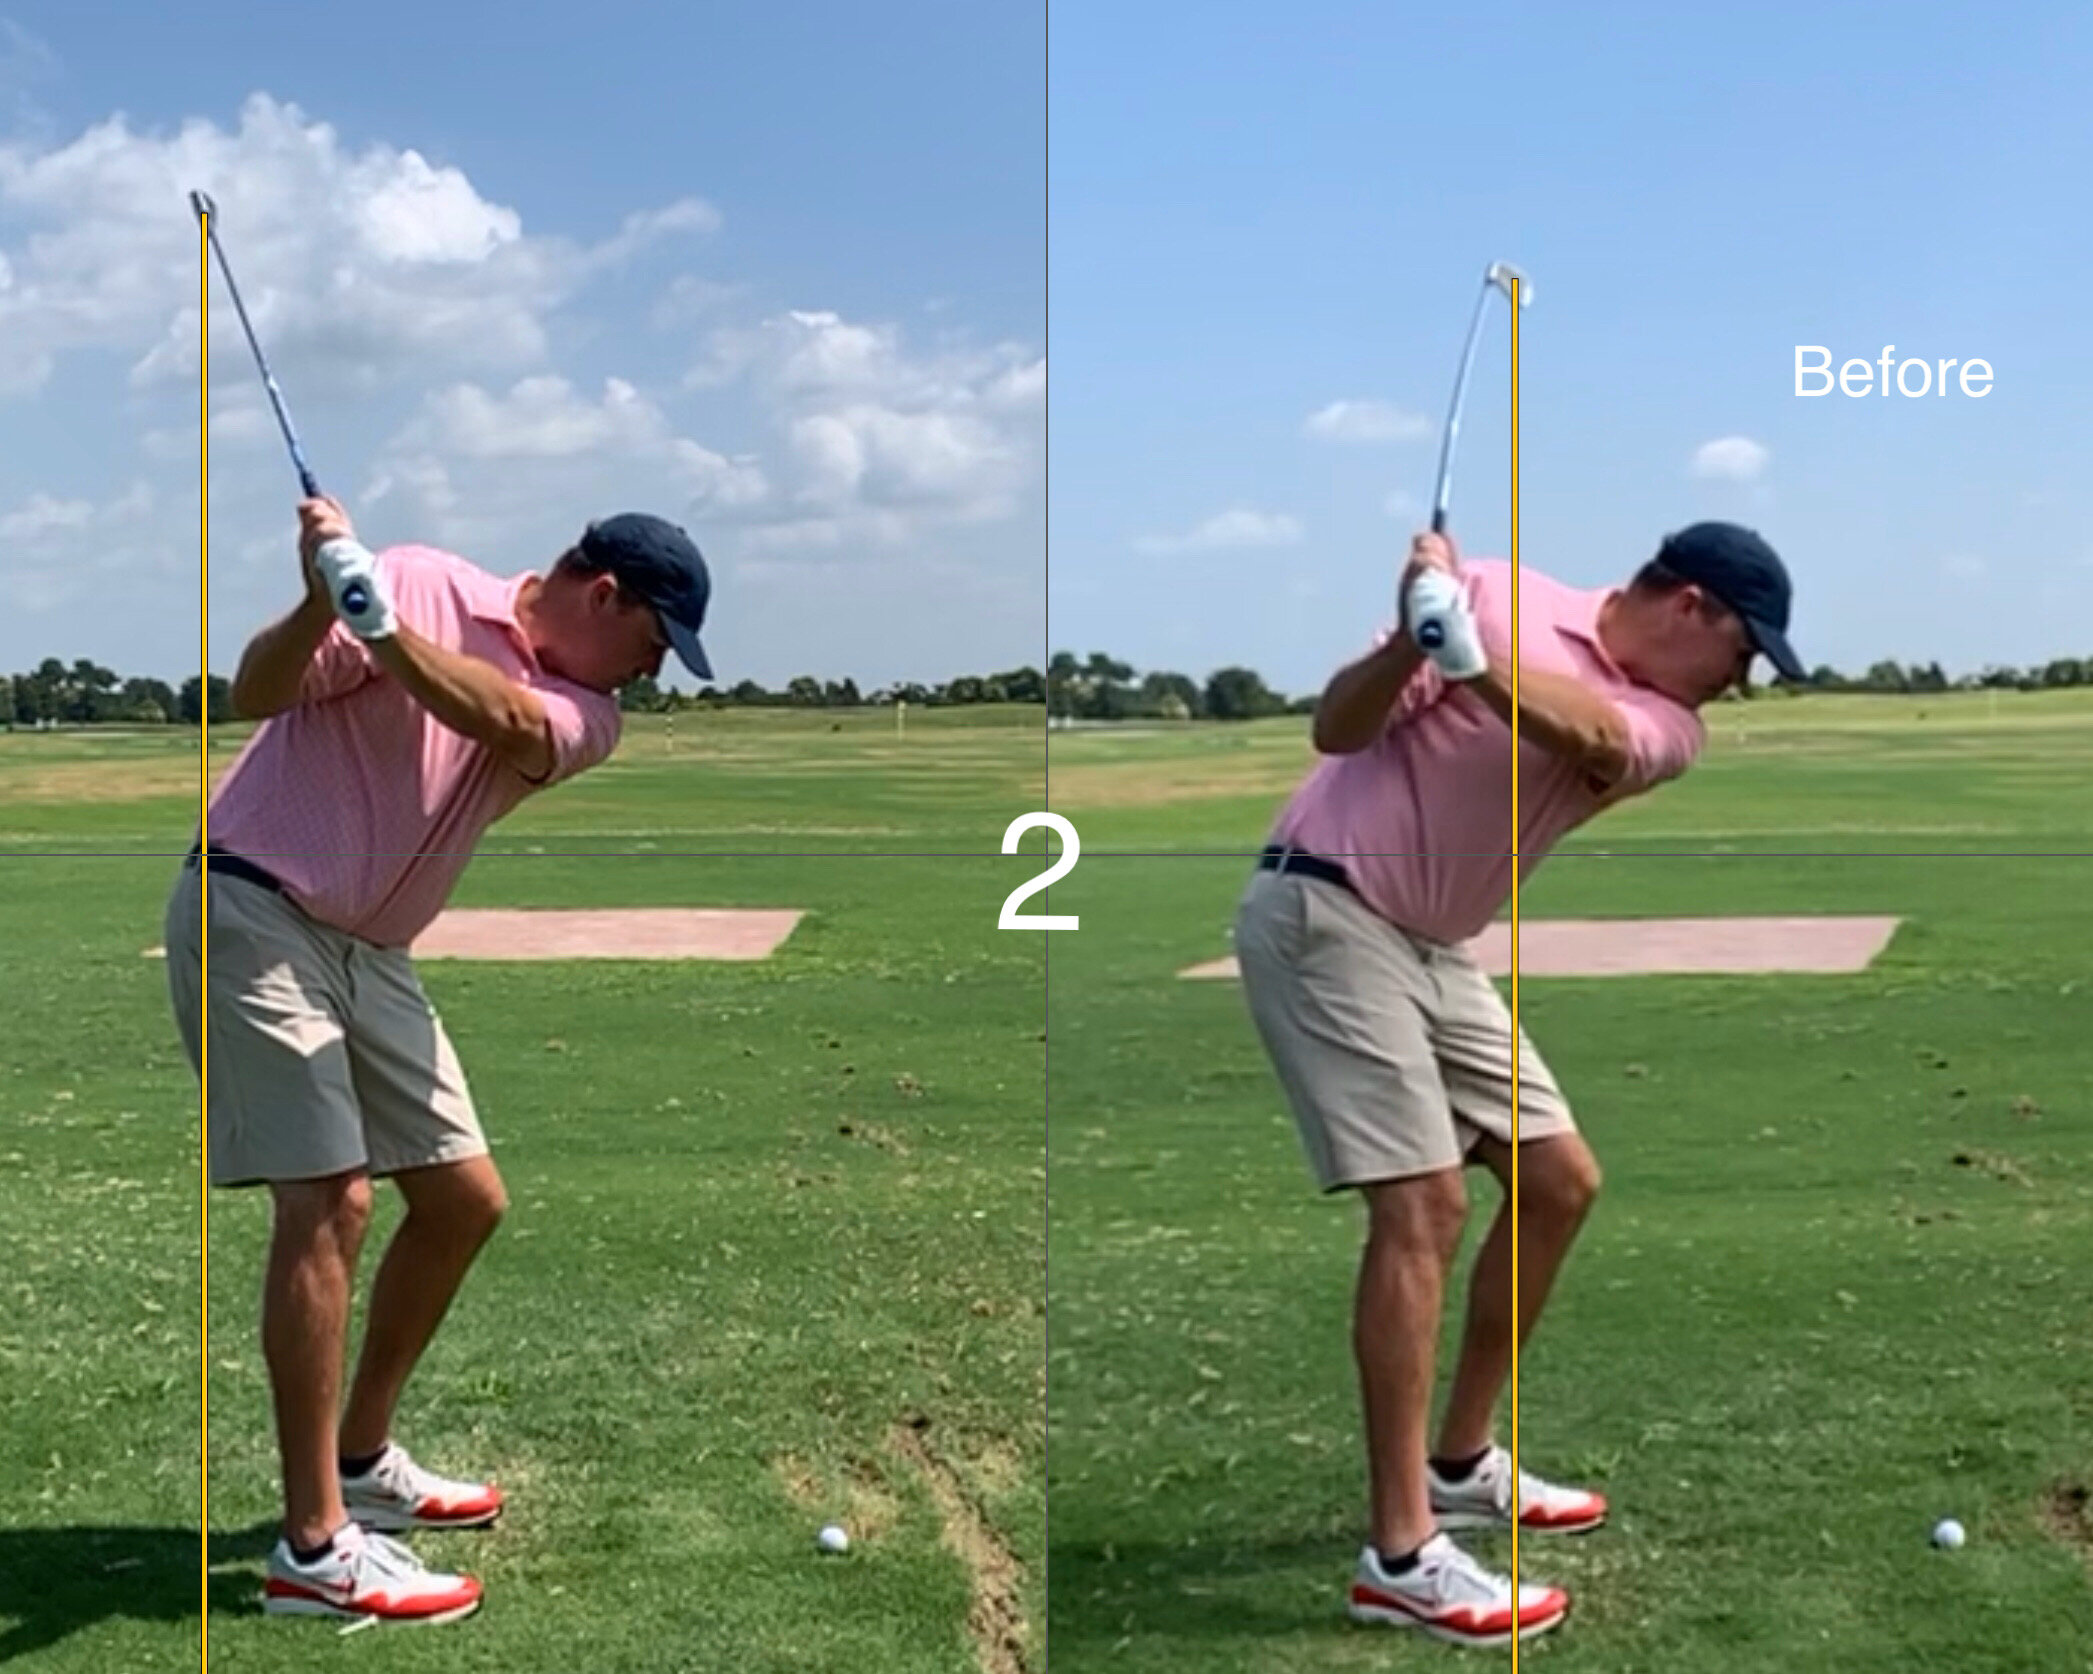
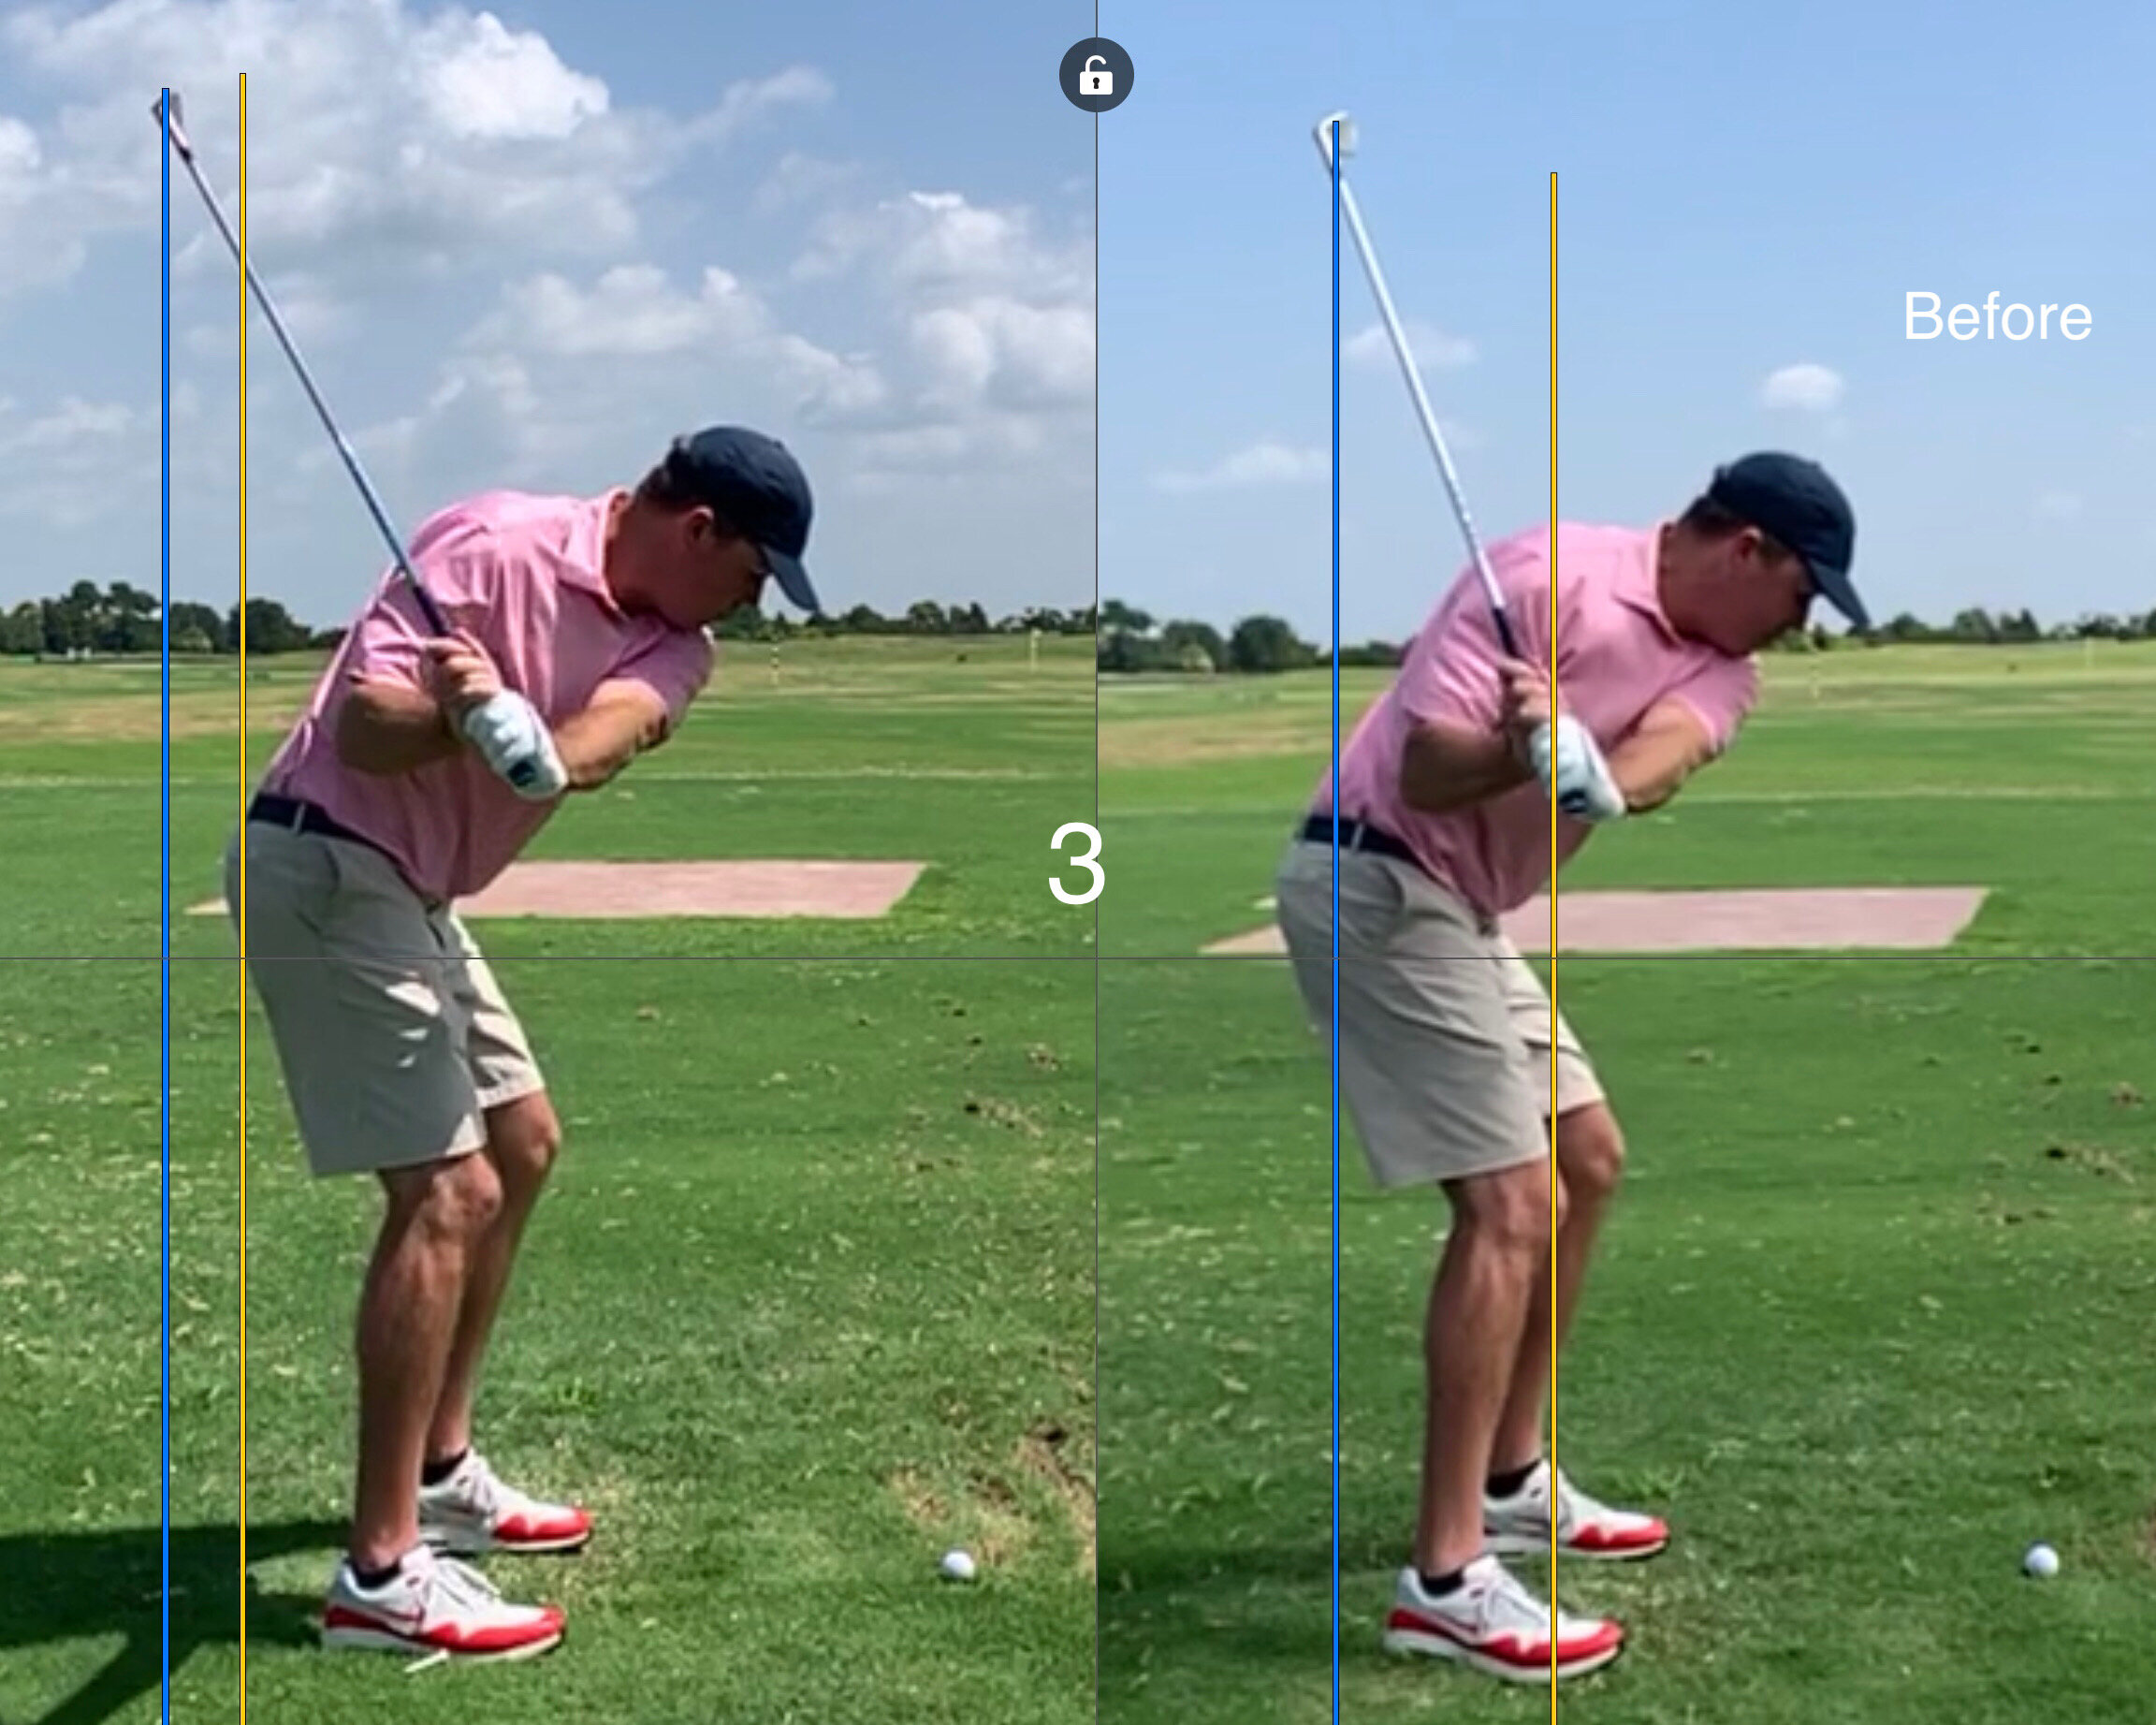
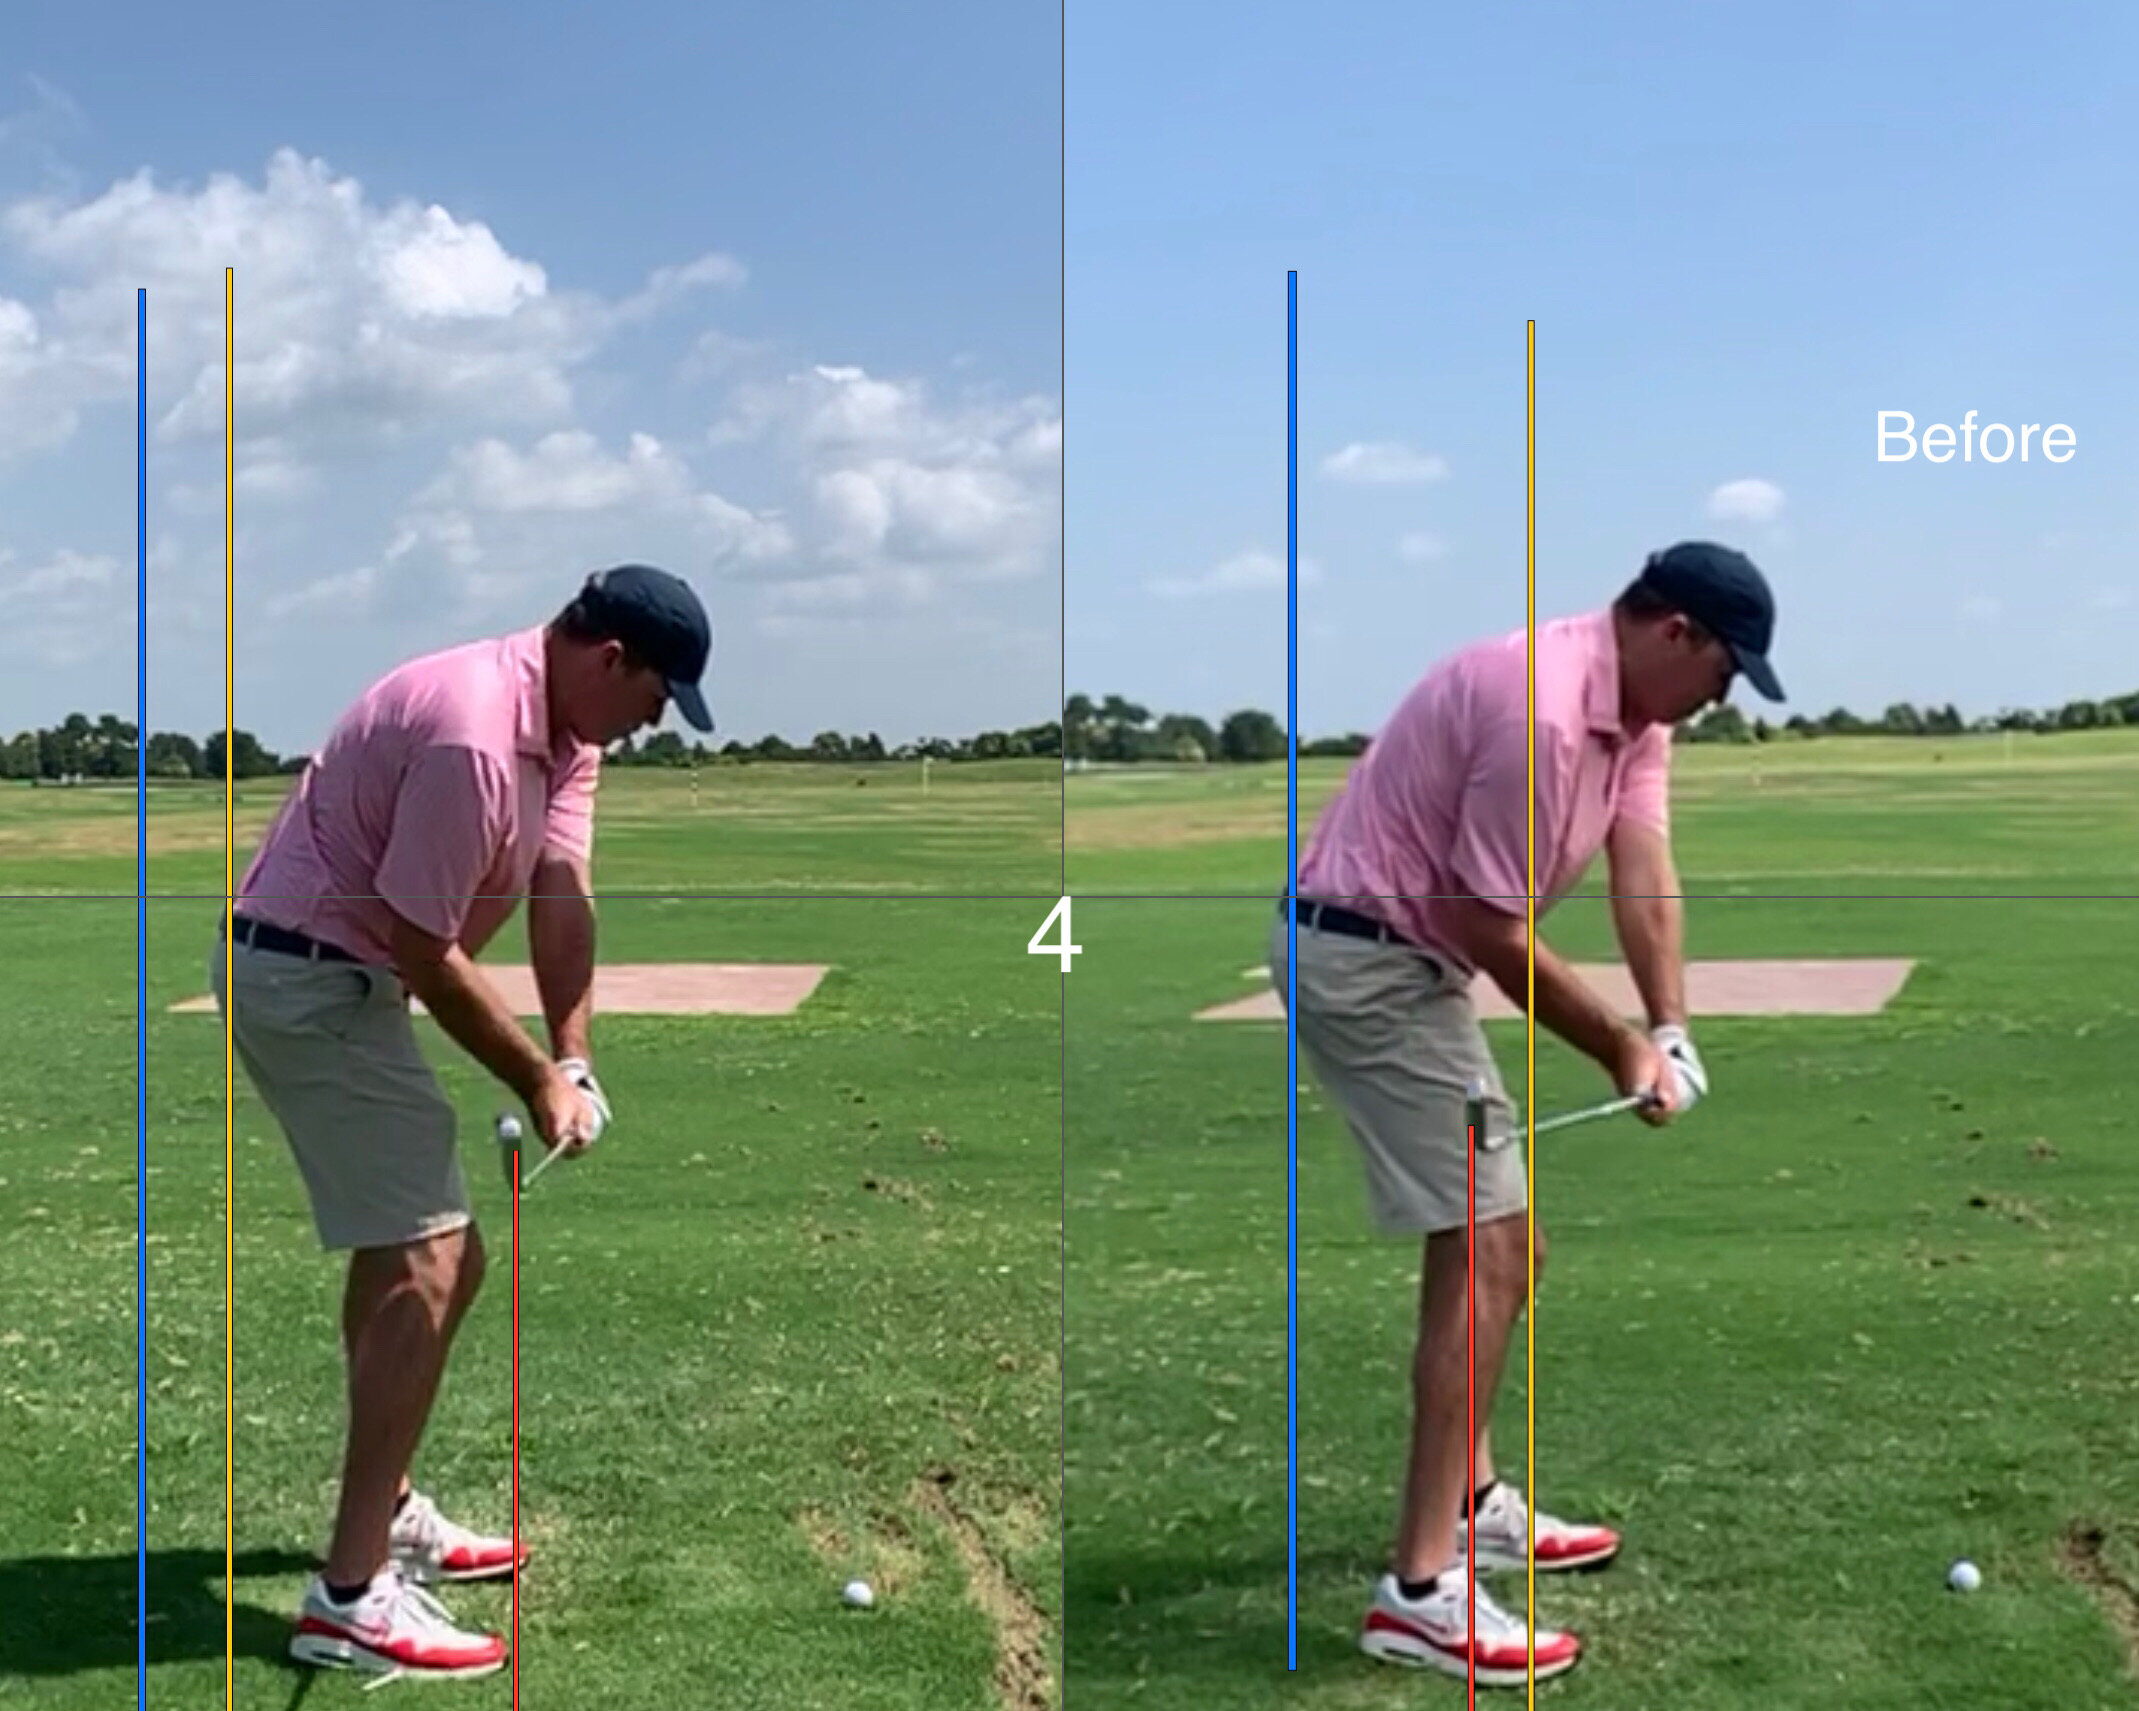
This is why looking at still frames of an athletic motion can be deceiving. There are six different images/videos here that we will go through in a specific order. To get the most out of this post please make sure you go through this it slowly. Be sure you comprehend each image before moving to the next…

614EC106-E63C-4C19-B0D3-B858E784B158.JPG

(The original/before is always on the right in all of the images/videos)

Image 1:

Notice how these two images appear to be somewhat similar. I think many of us would give them both a thumbs up! They might be somewhat similar, but the outcomes are very different due to the unseen forces being applied to the club. Do not be deceived!

DB255940-B2A6-477C-B9A5-F8545133331B.JPG

Image 2:

The player at the top of the backswing. The yellow line indicates where the sweet spot is relative to the feet and the golf ball. Notice that in the ‘after’ version the club head is significantly further to the inside than the original. This is shown by the distance between the line and the golf ball.

6F07DEF0-8421-449C-A111-4320A3C4E2B8.JPG

Image 3:

At approximately lead arm parallel to the ground notice how the golfer has had to force the club head to lay down on the before side. This is indicated by the difference in gap between the yellow and blue lines. Not much difference here, but the force the player is exerting on the club is very different here.

F07F5352-2ECE-48A5-BDD0-EE6285807F13.JPG

Image 4:

This is where the difference starts to show. On the right side you’ll notice that the excessive, yet necessary, lay down force has bled over and now has the club head in a position where the path will be too far out to the right, strike quality will be compromised and the player is dealing with blocks and hooks. Notice how the gap between blue and red line on the left is greater on the left side. That’s due to the fact that the golfer is free to rotate instead of having to force the club head to the inside in the downswing. Who wouldn’t want to turn hard and fire in the downswing?

Image 5:

The original downswing! With this move the golfer gets the club head too far to the inside coming into the golf ball and will struggle with blocks, hooks and poor quality strikes. Success with this downswing is very much timing reliant.

Image 6:

The objective for the downswing! With this move the golfer will deliver the club with a more neutral path, will hit down on the ball appropriately and be far less reliant on timing coming into impact. A happy golfer and coach.

So how did we get it done? With a short-ish backswing the club head needed to be in a better position at the top of the backswing as the player had very little time to calibrate and position the club head for a proper delivery. Our goal was to improve the position at the top of the backswing in order to make the downswing free-er so the golfer could rotate hard left through impact. A good recipe for crisp strikes coupled with improved accuracy.

The results here were as intended - a more neutral path and better attack angle for straighter and properly struck shots.

Please don’t ever judge a golf swing by one picture.

Build a Better Backswing

If you watch any golf on TV you’ll notice that there certainly doesn’t seem to be one backswing that is universal to all Tour players. Their backswings range from long to short, laid off to across the line and fast to slow. The million dollar question is which one will work best for you and your game. Watch this video to start to understand your options…

Length of Backswing

  1. Don’t be overly anxious to shorten your backswing. If the arms are collapsing or the hands are letting go then by all means work towards making the necessary upgrades.

  2. Longer backswings should almost have an across the line look, while shorter backswings simply must have the clubhead more behind them with a laid off look.

Amount of Time

  1. Ideally the amount of time taken once the club starts the motion away from the ball is right around 1 second. 0.75 seconds up to the top and 0.25 seconds for the downswing.

  2. Try the rapid fire drill to gain a sense of the appropriate amount of time as the vast majority of golfers take too much time and actually swing too slowly.

  3. The rolling start drill gets the club moving as it kicks the motion off.

Clubface Position

  1. Open face golfers will typically have a difficult time hitting low shots and generating enough compression. The clubface is almost always open in the early downswing and this leads to flipping through impact to get the clubface around.

  2. Closed face golfers will struggle to get their long irons in the air. Compression is fine and the ball goes far enough, but getting an appropriate trajectory is a challenge. Get the clubface vertical in the early part of the backswing. Have the intent to hit the ball really high in practice.

Ponder a few of these ideas, try a few of the drills and I hope that a few of these ideas help you to enjoy your next round of golf that much more.

SpiethTop.JPG

Cheers!

Get That Body Moving!

If you want the ball to get going you’ve got to get your body moving. For far too long the golf instruction community has restricted the pivot, but the advent of quality statistics and a deeper understanding of what truly matters in golf has opened our eyes to the value of distance. I get it - we’re all getting older. Me too! We must wage the battle against slower and smaller golf swings on a daily basis. This video in my “3 Keys Series” will help…

If you’re a seasoned veteran or someone that’s new to the game, these keys will help you hit the ball with more authority:

  1. Allow the lead heel to get up off the ground in the backswing and free up the lower body.

  2. Get your belt buckle pointing away from the target as much as you physically can in the backswing.

  3. Feel the lead shoulder stretch away from the target so that you can really feel the tension and torque in your body as you wind up.

I would encourage everybody to start doing this at home with out a club and in front of a mirror. You most likely know what it should look like, but we all need to get a feel for the right look. A mirror will help! From my own experience in working to incorporate these elements into my golf swing it will take some time as you get more comfortable with the bigger pivot, but the gains far outweigh the discomfort.

Stay patient and never give up trying to get better!

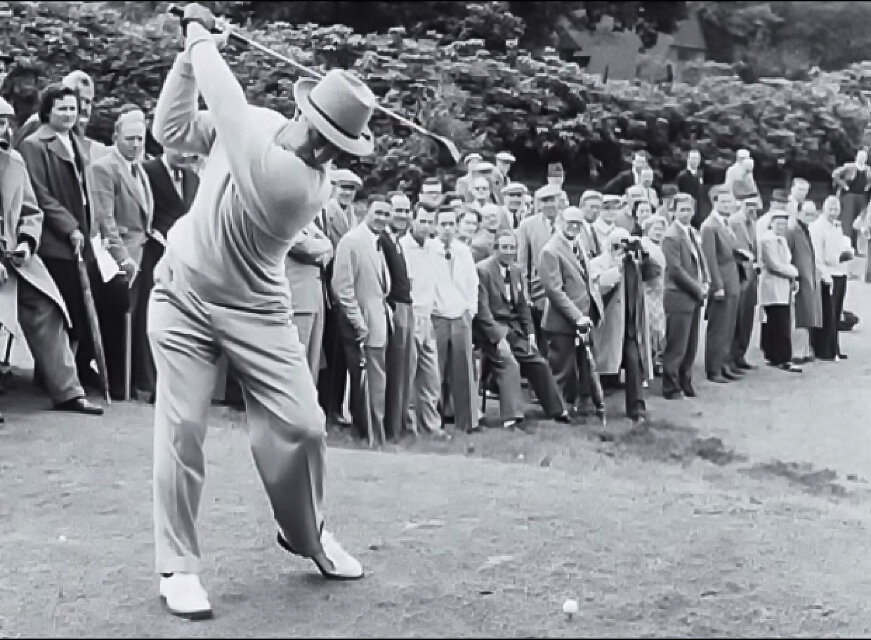
Sam Snead

Sam Snead


Take Swing Changes to the Course

If I had a dollar for each time a golfer has said, “I’m great on the range, but I just can’t take it to the course” I’d be a wealthy man! I believe there are multiple reasons for this quandary many find themselves in. Firstly, most golfers don’t know how to practice in order to simulate an on-course environment and secondly it’s because when most golfers work on technical changes they don’t know how to go about assimilating the new moves into a full speed swing. Today we are going to address this important topic: How to take ownership of swing upgrades. Watch…

A few key points:

  • Use a 7 or an 8 iron

  • Use an alignment aid

  • Incorporate multiple rehearsals between each shot (get the FEEL!)

Level 1

  • Technical, slow , tedious and deliberate

  • Ball on a tee

  • Feel the positions

  • Incorporate pauses in the motion

  • Lots of rehearsal

  • Soft, tapping little shots

Level 2

  • Blend in rhythm

  • Slow motion without any pauses

  • Ball on starts a tee and then we get it on the ground

  • Lots of rehearsal between each shot

  • Shots will not go very far

Level 3

  • Start off at about 3/4 speed

  • Ball on the ground

  • Slowly build up to 100% speed

  • Continue to make rehearsals between each shot

Keep in mind that objective of any technical swing work is to upgrade the mechanics while still operating at full, or perhaps even, faster speed. It’s also important to note that this method of practice only addresses the technical side. There is so much more required in order to take it to the course and that’s why I often talk about…

SWING, SKILL & SHOT.

Thanks for tuning in and please share with a friend who you know would benefit!

7.jpg


TrackMan: Definitive Answers at Impact and Beyond

trackman 4

trackman 4

Here is some interesting, albeit older, data mined by TrackMan from the PGA and LPGA Tours….

(Please note that these are all averages)

  • PGA Tour - Each club in the bag hits the ball the same average height30 yards.

  • LPGA Tour - Each club in the bag hits the ball the same average height25 yards.

My take away here is that slower club speeds will typically always hit the ball at lower peak heights than players with higher club speeds. My findings using TrackMan over the years have also shown me that slower player typically need to deliver more loft at impact, they need less shaft lean and they need to hit down less than their higher speed counterparts.

  • In conditions that eliminated any roll, an average PGA Tour player would hit a driver and a 5-wood 500 yards; a driver and a 7- iron 441 yards; and a driver and a PW 405 yards.

  • In conditions that eliminated any roll, an average LPGA Tour player would hit a driver and a 5-wood 405 yards; a driver and a 7- iron 361 yards; and a driver and a PW 327 yards.

I’m not sure about you, but those are some hefty differences. Far too many courses I play have the ladies tees way too far back! I find that in general, both men and women play golf courses that are too long for them. An interesting exercise is to multiply the distance you CARRY a 5 iron by 36 - that’s the maximum length golf course you should be playing.

  • The carry distance gaps between irons for PGA Tour players are typically greater from club to club than they are for LPGA Tour players.

This indicates that higher speed golfers have an easier time spotting a distance difference between each club. It’s amazing how many ladies say they hit all their irons the same distance! You don’t, it’s just quite often difficult to determine much of a difference. As overall club speeds get slower the player should ideally carry fewer clubs so as to be able to establish differences between clubs and reduce overlap.

Tony Finau using Trackman at Ping HQ

Tony Finau using Trackman at Ping HQ

Some useful General information:

  • Shot direction is primarily determined by a combination of face angle, club path and impact location.

  • The ball launches primarily in the direction of the club face - approximately 75-85% on full shots.

  • For putting, shot accuracy is determined primarily by the face angle - the softer the hit (as in chipping and putting) the greater the effect of clubface. In putting the face accounts for 95+% of where the ball goes.

  • Face angle (largely) determines the launch direction while shot curvature/shape is mostly determined by the club path relative to the face angle. Think of it this way: when a ball is struck with a descending blow, i.e. ball first, ground second, the attack angle is down, yet the ball goes up. The ball goes up due to the angle/loft of the face!

  • The initial ball direction falls between the club face angle and club path yet it greatly favors the face angle.

  • The further apart the club face and club path diverge from each other (basically - point in different directions) the more the ball's spin axis tilts and the more curvature exists on the shot.

  • There isn’t really ever side spin - it is merely back spin on a tilted axis and the more the axis tilts, the more the ball flight curves.

  • The average male golfer swings a driver somewhere between 82 and 88 mph.

  • A carry distance of 100 yards for ladies is typically equivalent to a carry distance of 130 yards for men; 200 yards for ladies is equivalent to 250 yards for men.

  • A par four of 350 yards for ladies is typically equivalent to a par four of 430 yards for the men.

  • The most important factor in increasing carry distance is clubhead speed. With the driver, for every 1 mph you add to your swing speed you stand to gain around 2.75 yards.

  • An increase of 1” in the length of a club will typically only increase the clubhead speed by 1 mph.

  • The quality of the hit is very important as it relays clubhead speed into ball speed. Smash factor is calculated by dividing the ball speed by the clubhead speed. A smash factor of 1.5 is most often only attainable with the driver.

  • The ball spends 1/2000th of a second on the clubface. That means it would take a scratch handicap golfer almost 28 rounds of even par golf to have the ball be on the clubface for one second!

I have been privileged to have access to TrackMan in my teaching for almost 10 years now. I can unequivocally say that it has helped become a better teacher and coach. Yes, it’s a costly piece of equipment, but one that has paid dividends time and time again for me. There is no possible way I would be where I am today without this little orange box!

SBP_3926.jpg